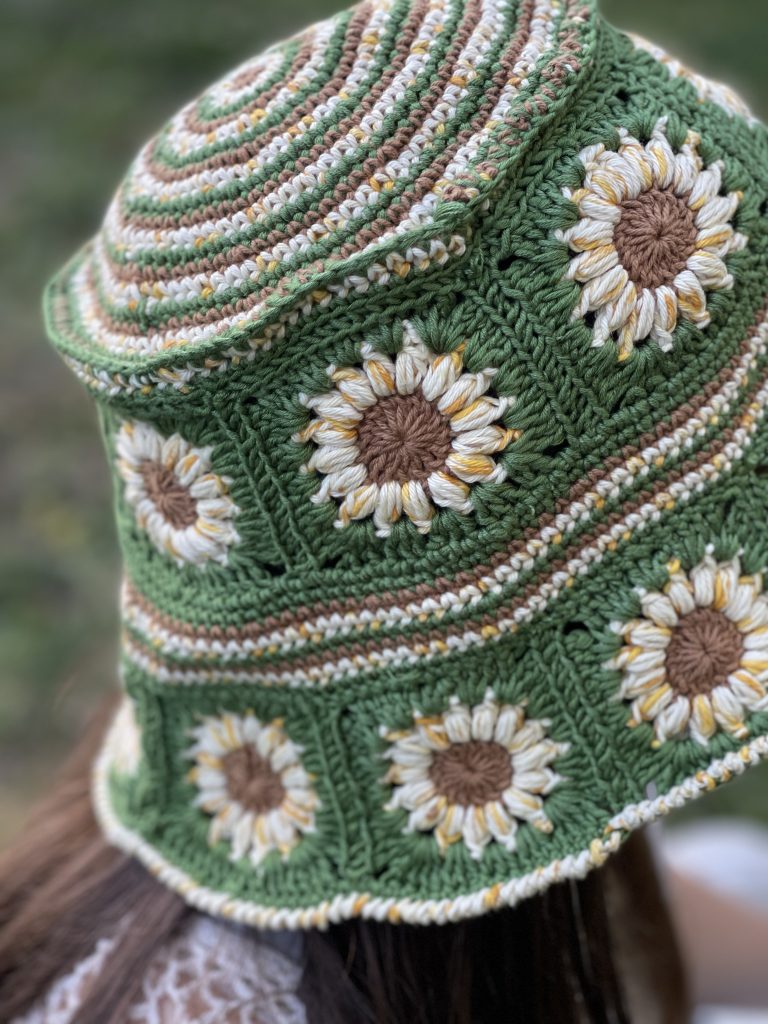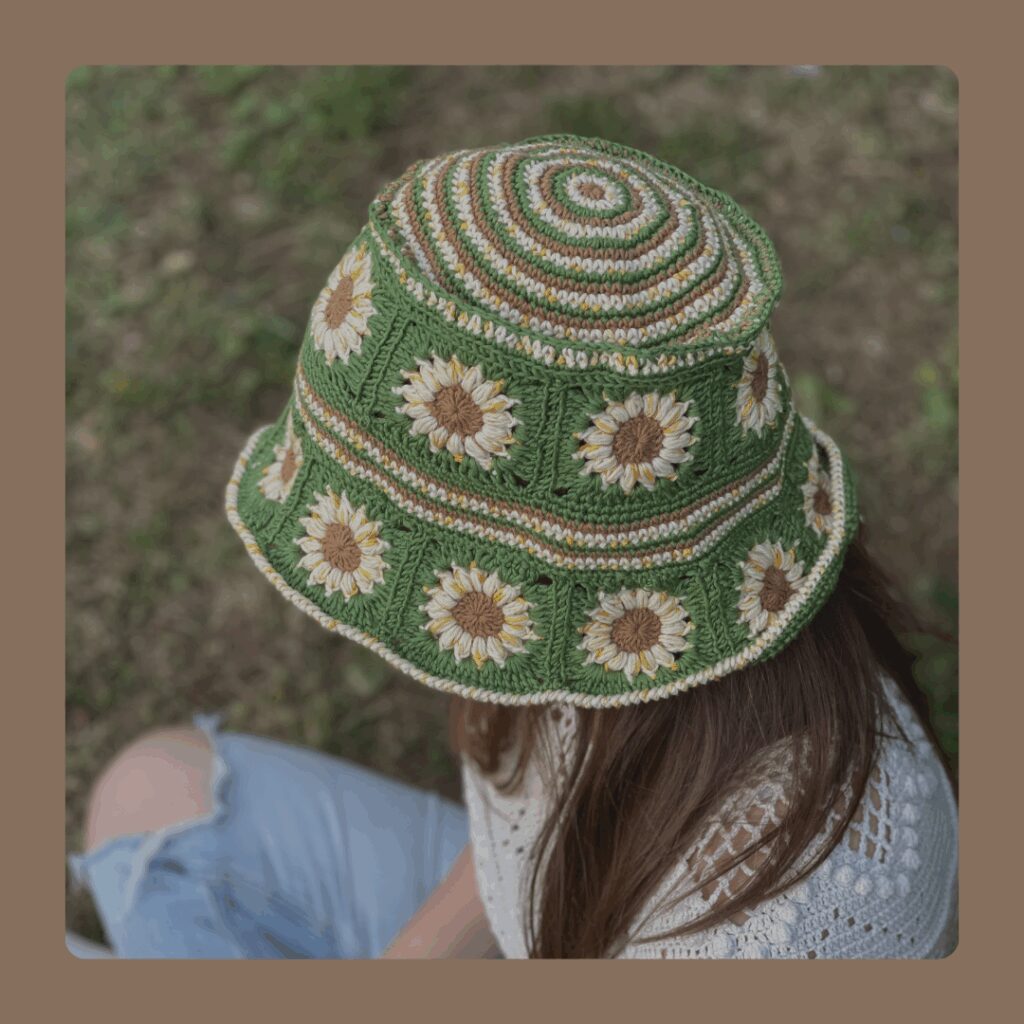
Hola Anandinis!
Ya estamos listas con las segunda parte y final del Bucket Hat 🙂 Estoy muy contenta de ver los avances que han compartido conmigo y si aún no lo tejes, no te preocupes que aún hay verano 🙂 Entonces sin más preámbulo, ¡Comencemos!
Hello Anandinis!
We are ready with the second and final part of the Bucket Hat 🙂 I’m very happy to see the progress you’ve shared with me and if you still don’t crochet it, don’t worry, there’s still summer 🙂 So without further ado, let’s get started!
PANEL 2
2DO GRANNIE
Este grannies es bastante similar al anterior, sólo que aquí hacemos una pequeña modificación para darle amplitud al gorro
Rnd: Ronda
cad: cadeneta
pa: punto alto
pd: punto deslizado
mpa: medio punto alto
dpa: doble punto alto
PF: Punto puff (puedes ver cómo lo hice en mi perfil de ig)
esp-1cd: Debes tejer en el espacio que deja 1cad anterior
2ND GRANNY
This granny is quite similar to the previous one, except that here we make a small modification to give the hat more width.
Rnd: Round
ch: chain
dc: double crochet
hdc: half double crochet
sl st: slip stitch
tr: treble crochet
CL: cluster st
ch-1sp: insert your hook into the space/hole/gap (underneath the chain)
START
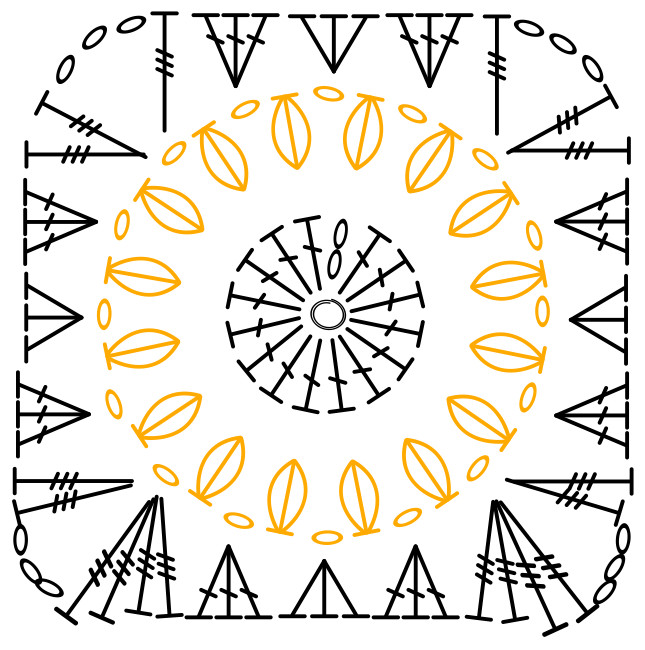
Rnd1: C1. doble anillo mágico, 2cad (cuentan como 1 pa), 15pa, tira, pd para unir, cierra y corta. [16pa]
Rnd2: C2. *1PF en pa, 1cad, rep desde* 16 veces, pd para unir, cierra y corta. [16PF, 16cad]
Rnd3: C3. 3pa en esp-1cd, 3mpa en esp-3cd, 3pa en esp-3cd, (1dpa, 3cad, 2dpa)en sig esp-1cd, 3pa en esp-1cd, 3mpa en esp-3cd, 3pa en esp-3cd, (2dpa, 3cad, 4dpa)en sig esp-1cd, 3pa en esp-1cd, 3mpa en esp-3cd, 3pa en esp-3cd, (4dpa, 3cad, 2dpa)en sig esp-1cd, 3pa en esp-1cd, 3mpa en esp-3cd, 3pa en esp-3cd, (2dpa, 3cad, 1dpa)en sig esp-1cd, pd para unir, cierra y corta.
Rnd1: C1. double magic ring, ch2 (count as 1dc), 15dc, sl st to join, fasten off. [16dc]
Rnd2. C2: *1CL in dc, ch1, rep from* 16 times, sl st to join, fasten off. [16CL, 16ch]
Rnd3: C3. 3dc in ch-1sp, 3hdc in ch-1sp, 3dc in ch-1sp, (1tr, ch3, 2tr)in ch-1sp, 3dc in ch-1sp, 3hdc in ch-1sp, 3dc in ch-1sp, (2tr, ch3, 4tr)in ch-1sp, 3dc in ch-1sp, 3hdc in ch-1sp, 3dc in ch-1sp, (4tr, ch3, 2tr)in ch-1sp, 3dc in ch-1sp, 3hdc in ch-1sp, 3dc in ch-1sp, (2tr, ch3, 1tr)in ch-1sp, sl st to join, fasten off.
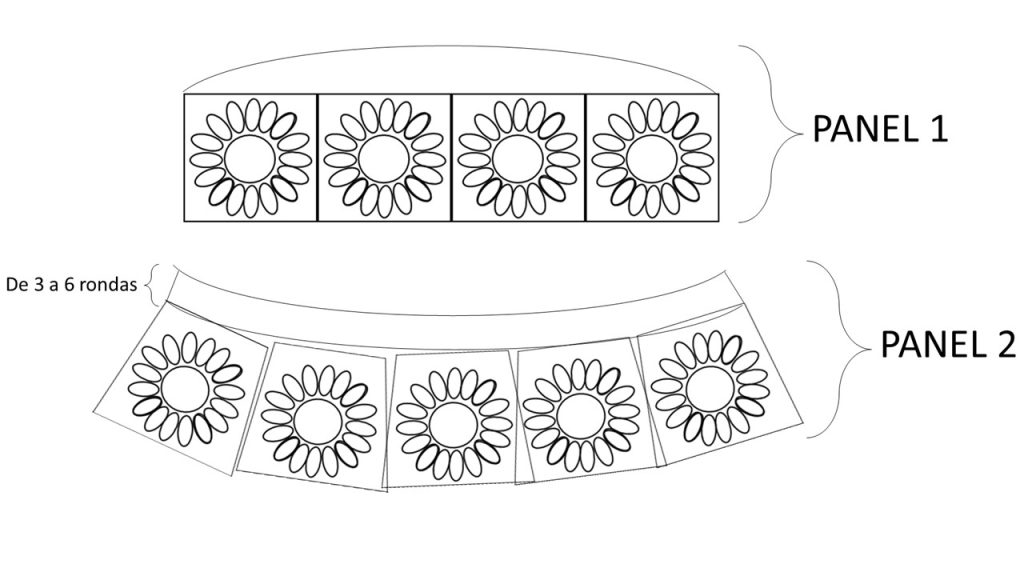
ANTES DE SEGUIR TEJIENDO ¿Cuántos grannies hacer?
Aquí tienes total libertad de elegir, yo te recomiendo hacer sólo 2 más de los que hiciste en el primer panel (máximo 3), ya que si haces demasiados puede que quede demasiado «repolludo» y luego no tome forma de gorro.
CONTEO DE PUNTOS
Luego de haber hecho los grannies necesarios necesarios, únelos en los extremos de la derecha e izquierda. La parte más pequeña quedará hacia arriba y la parte más ancha hacia abajo. Cuenta cuántos puntos tienes alrededor de la circunferencia de la parte más pequeña, este número será muy importante ya que ahora tejeremos desde los grannies del panel 1.
BEFORE CONTINUE WORKING How many grannies do you want to make?
Here you have total freedom of choice, I recommend you to make only 2 more than you did in the first panel (maximum 3), because if you make too many you might get too «floppy» and then it won’t take the shape of a hat.
COUNTING THE STITCHES
After you have made the necessary grannies, join them at the left and right ends. The smaller part will face up and the wider part will face down. Count how many stitches you have around the circumference of the smaller part, this number will be very important as we’ll now work from the grannies in panel 1.
TEJAMOS
Desde los grannies hechos en el panel 1, vas a tejer de 3 a 6 rondas de puntos bajos aumentando los puntos necesarios que te lleven al mismo número de puntos que tiene la circunferencia de grannies del panel 2.
Es decir, si cuando terminaste los grannies del panel 1, su circunferencia te dió 112 puntos, y al terminar de unir los grannies del paneñ 2, la circunferencia de la parte más angosta te dió 130 puntos, quiere decir que tendrás que aumentar 18 puntos en esas rondas entre grannies.
Te recomiendo hacer aumentos progresivos y no todos en una sola ronda. Por ejemplo, si debo aumentar 18 puntos, haré 3 aumentos en cada ronda (si hago 6 rondas).
Luego unes los grannies desde su parte más angosta, a la última ronda hecha. Con esto ya tendrás el gorro casi listo.
LET’S CROCHET
From the grannies made in panel 1, you are going to work 3 to 6 rounds of single crochet increasing the stitches necessary to get the same number of stitches as the circumference of the grannies in panel 2.
That is, if when you finished the grannies of panel 1, their circumference gave you 112 stitches, and when you finished joining the grannies of panel 2, the circumference of the narrowest part gave you 130 stitches, it means that you will have to increase 18 stitches in those rounds between grannies.
I recommend you to make progressive increases and not all in one round. For example, if I have to increase 18 sts, I´ll work 3 increases in each round (if I work 6 rounds).
Then you join the grannies from their narrowest part, to the last round done. With this you will have the cap almost ready.
una vez unidos los grannies, sólo nos quedan los detalles.
Tejerás por toda la circunferencia más ancha del gorro, una ronda de punto cangrejo, que se trabaja de la misma forma que un punto bajo, pero hacia la derecha.
DETALLES
Si el bucket hat te queda hacia abajo y no tiene forma, puede que la causa se deba por dos razones:
- Haz hecho muchas rondas en la base y ésta te ha quedado más grande que la circunferencia de los grannies del PANEL 1
- Los grannies te quedaron muy grandes y eso le agrego mucha altura al tejido, por lo que se caerá en vez de tomar forma de gorro.
Finishing
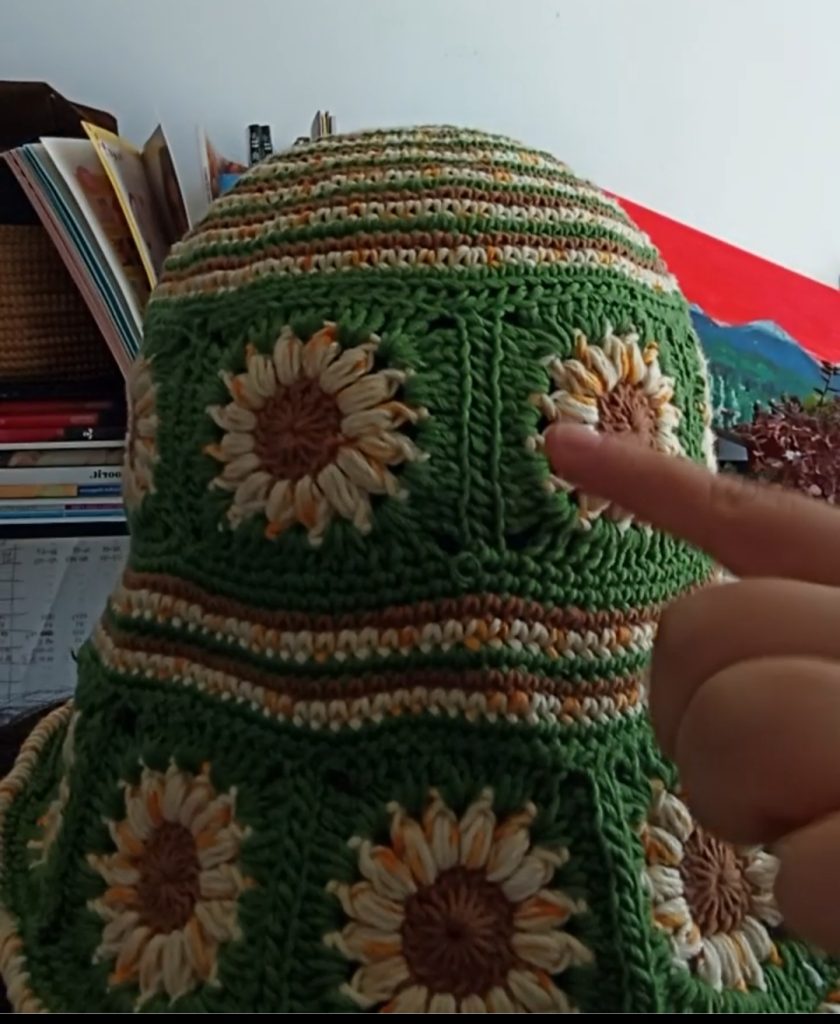
Once the grannies have been joined together, all that remains are the details.
You’ll work all around the widest circumference of the hat, a round of crab stitch, which is worked in the same way as a single crochet, but to the right.
DETAILS
If your bucket hat is down and out of shape, there may be two reasons for this:
- You have made too many rounds in the base and the base is larger than the circumference of the grannies in PANEL 1.
- The grannies were too big and that added a lot of height to the fabric, so it will fall down instead of taking the shape of a hat.
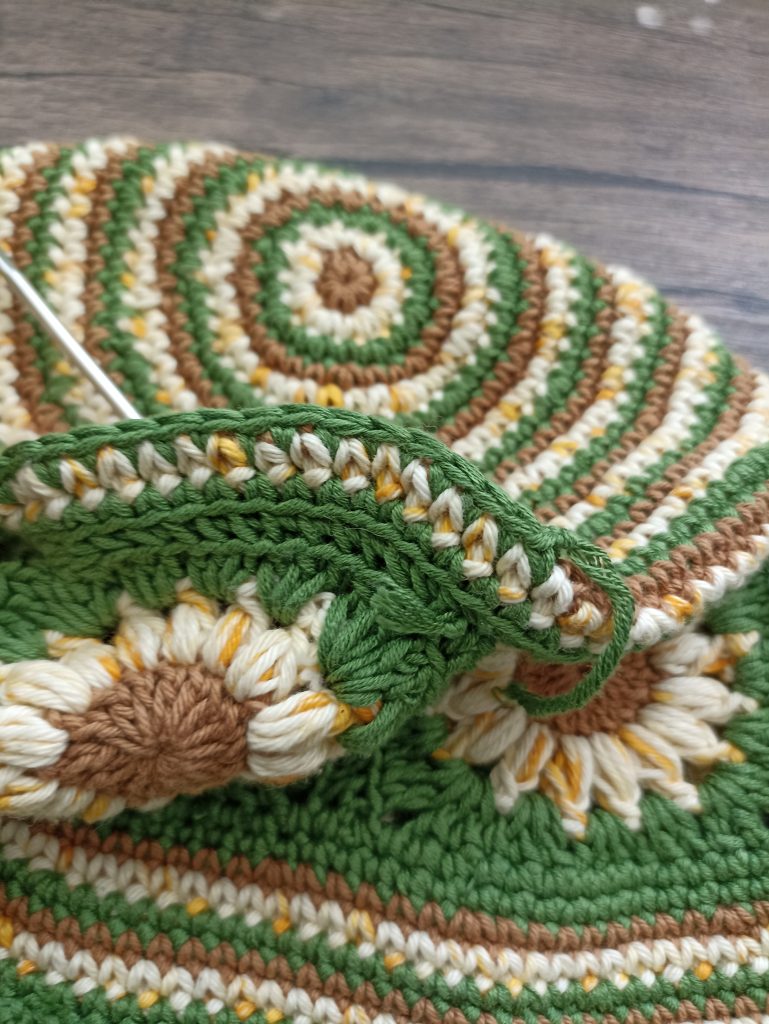
¿QUÉ PUEDES HACER?
Podemos ajustarlo con un poco de trabajo en la zona de la base: Tomarás la punta de la base, en donde están los grannies del PANEL 1 y las últimas rondas de la base como se muestra en la foto de abajo. Comienza a tejer puntos bajos tomando de 2 a 3 filas a la vez, de esta manera podremos darle forma
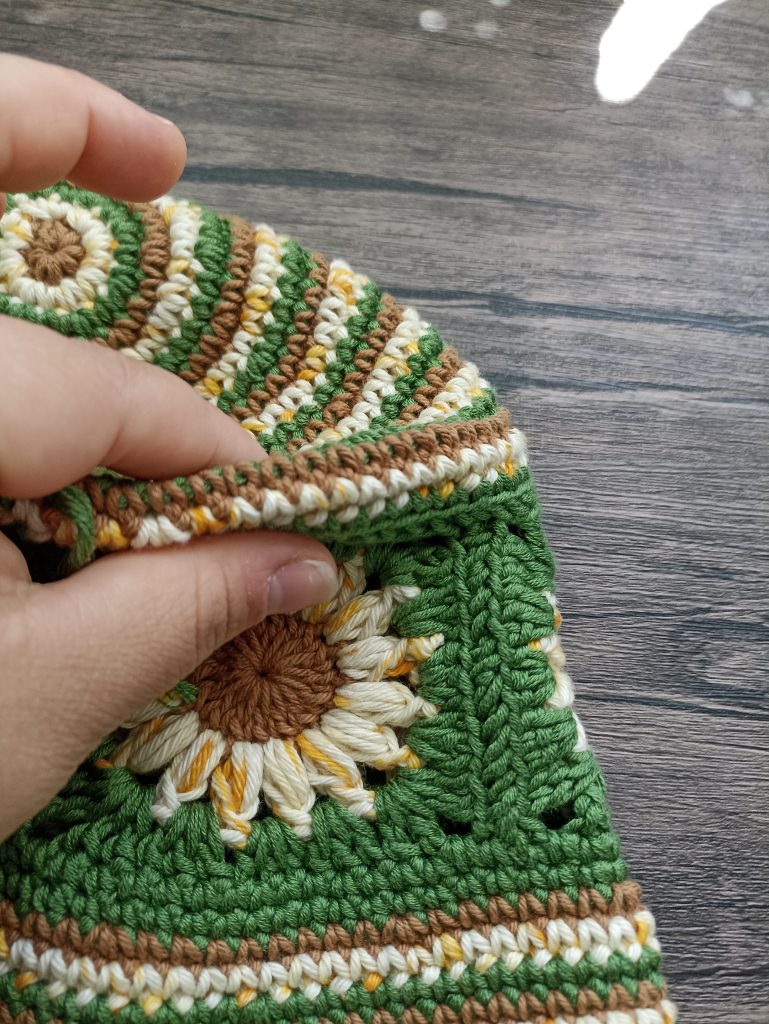
WHAT CAN WE DO?
We can adjust it with some work in the base area: You’ll take the tip of the base, where the grannies of PANEL 1 are and the last rounds of the base as shown in the picture below. Start working low stitches taking 2 to 3 rows at a time, this way we’ll be able to shape it.
AND DONE! YA TENEMOS NUESTRO BUCKET HAT!