Hola crocheters! después de un tiempo largo sin publicar nada, vengo nuevamante con un post amigable y que toda/o tejedor/a debe saber!
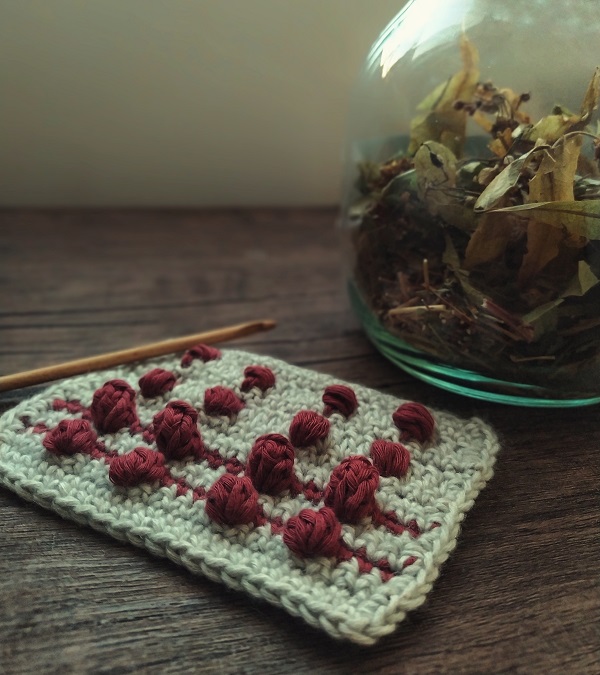
Yo les llamo los puntos gorditos y son todos aquellos puntos rellenitos como el punto popcorn, piña, bubble, puff, garbanzo, palomita, frijol… uff! por cuántos más y por un sin fin de nombres les conocemos?.
Nuestra habla hispana es tan rica en culturas y costumbres, que podemos ver traducidas esas riquezas en nuestras formas de expresarnos, en cada región y territorio podremos encontrar por varios nombres un mismo punto.
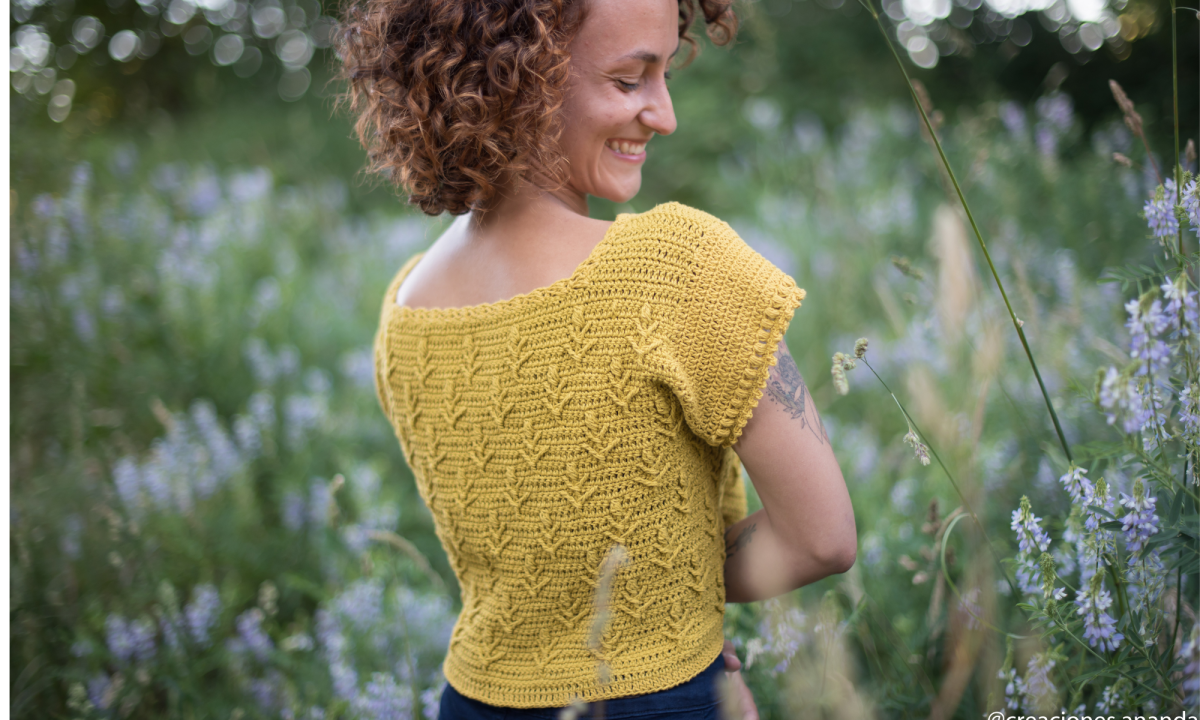
Personalmente me gusta mucho utilizar estas puntadas en mis proyectos, especialmente de lace y overlay crochet. Me permiten jugar con las texturas, puedes ser puntos representativos de muchas cosas en la naturaleza y eso me encanta. Y bueno, hoy les enseñaré algunos de los puntos que conozco, por los nombres con que los conozco y además les daré algunos tips para su contrucción. Si eres nuevo en el mundo del ganchillo o tienes problemas con estas puntadas, sigue leyendo.
Hello crocheters! after a long time without posting anything, I come back with a friendly post that every crocheter should know!
I call them the chubby stitches and they are all those little stuffed stitches like popcorn, pineapple, bobbles, cluster, puff, garbanzo, palomita, frijol… uff! by how many more and by an endless number of names do we know them….
Specifically, the Spanish speaking world is so rich in cultures and customs, that we can see these richnesses translated in our ways of expressing ourselves, in each region and territory we can find several names for the same point in Spanish, and that can sometimes be a little confusing.
Personally I like to use these stitches in my projects, especially lace and overlay crochet. They allow me to play with textures, they can be representative stitches of many things in nature and I love that. And well, today I will show you some of the stitches I know, by the names I know them by and I will also give you some tips for their make. So, if you are new to crochet or struggle with this kind of stitches, keep reading.
POPCORN STITCH/ PUNTO POPCORN o PALOMITA
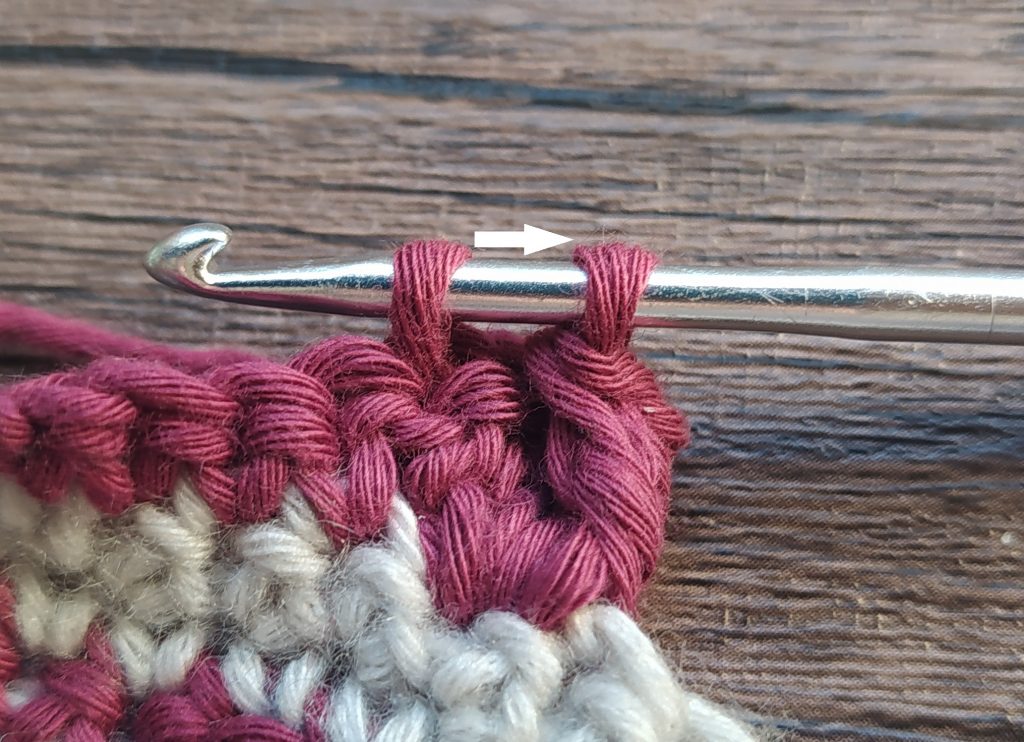

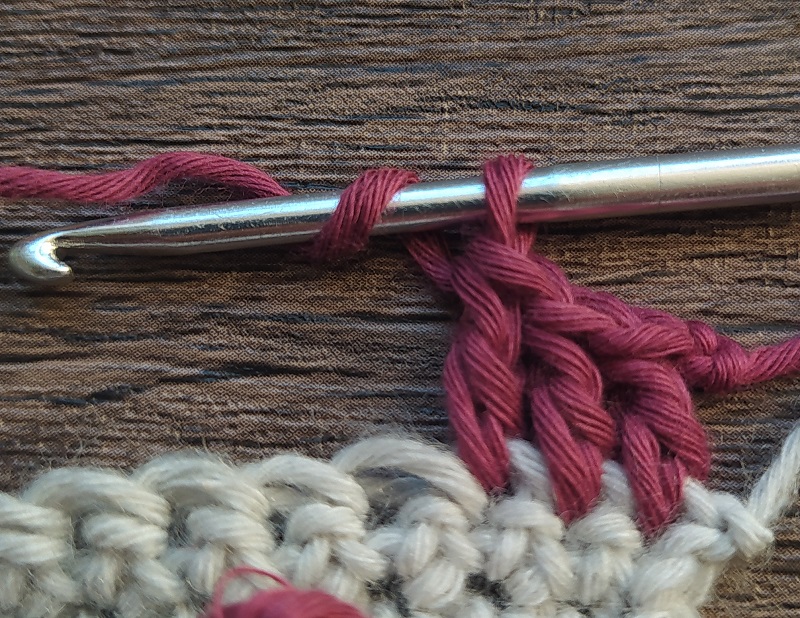
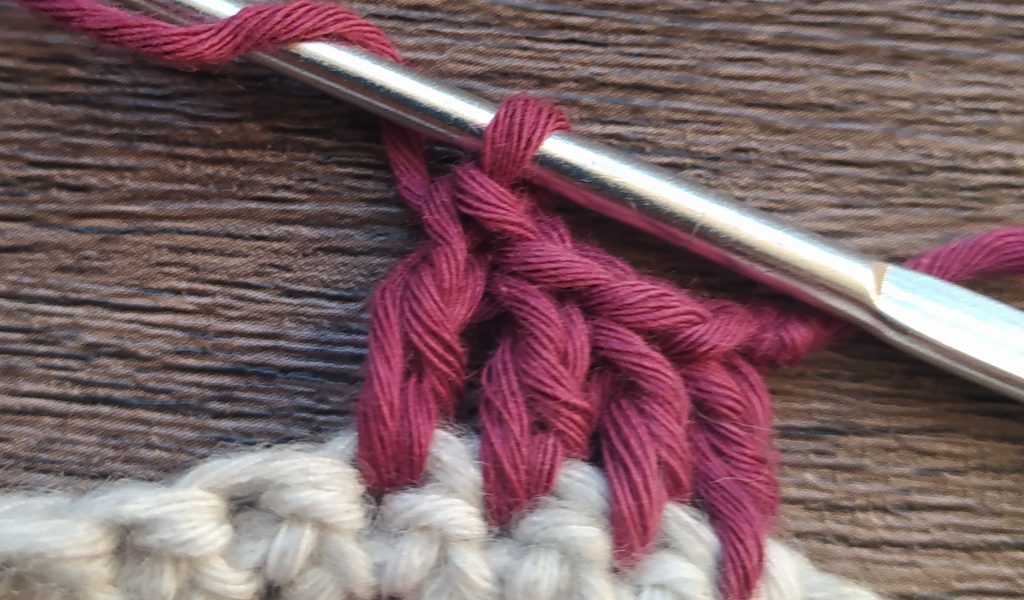
CÓMO HACERLO: Teje 5 puntos altos en el mismo punto base. Por el lado reveés del tejido, introduce tu ganchillo de atrás a adelante del tejido por debajo el primer punto alto que hiciste en este grupo. Lazada, pasa la hebra por el punto y tira de ella a través del primer punto alto, y nuevamente pásala por la lazada en tu ganchillo.
OTRA FORMA DE HACERLO: Teje 5 puntos altos en el mismo punto base. Suelta la lazada de tu ganchillo. Introduce tu ganchillo de delante a atrás por el primer punto alto del grupo. Agarra la lazada caída con tu ganchillo y tira de ella a través del punto y lazada en tu ganchillo.
Puedes encontrarlo con abreviación «POP o PC» en los patrones de tejido. Puedes trabajar las puntadas popcorn de modo que «salgan» hacia el frente o el revés de tu tejido, dependiendo de dónde quieras que destaquen.
HOW TO MAKE IT: Work 5 double crochet (dc) stitches in the same stitch. Insert your hook from back to front under the top 2 loops of the first double crochet of the group. Yarn over and pull it throught the first dc, and pull it through loop on your hook
ANOTHER WAY TO MAKE IT: Work 5 double crochet (dc) stitches in the same stitch.
Drop the loop from your hook. Insert your hook from front to back under the top 2 loops of the first double crochet of the group. Grab the dropped loop with your hook and pull it through the stitch.
The popcorn stitch (abbreviated pop or pc). You can work popcorn stitches so that they “pop” to the front or the back of the fabric, depending on where you want them to stand out.
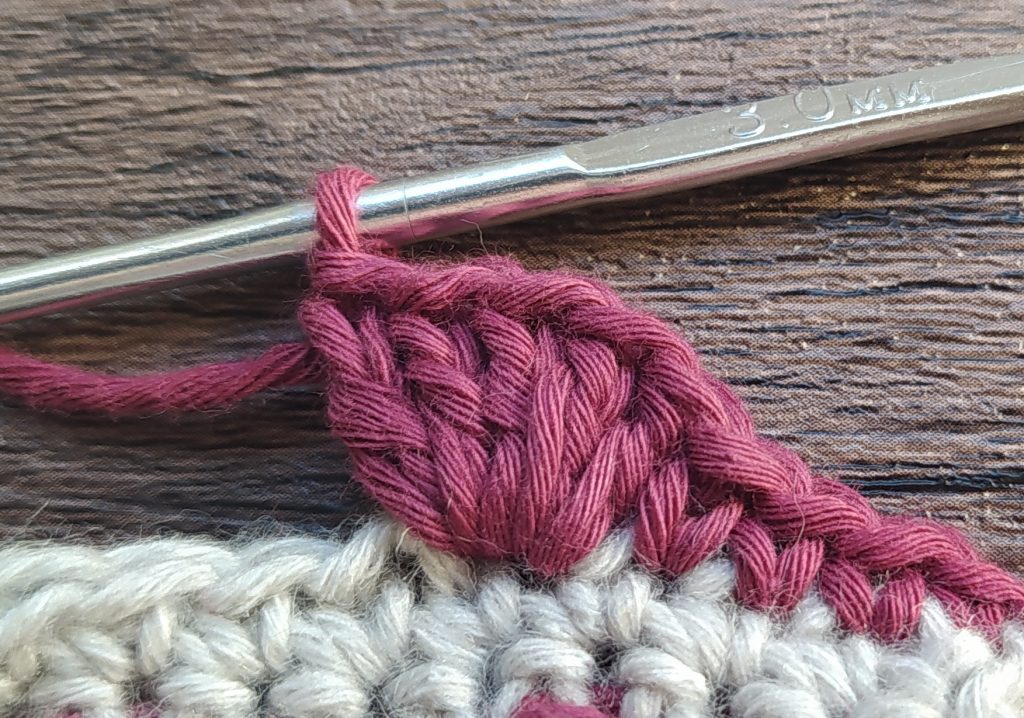
BOBBLE STITCH / PUNTO PIÑA

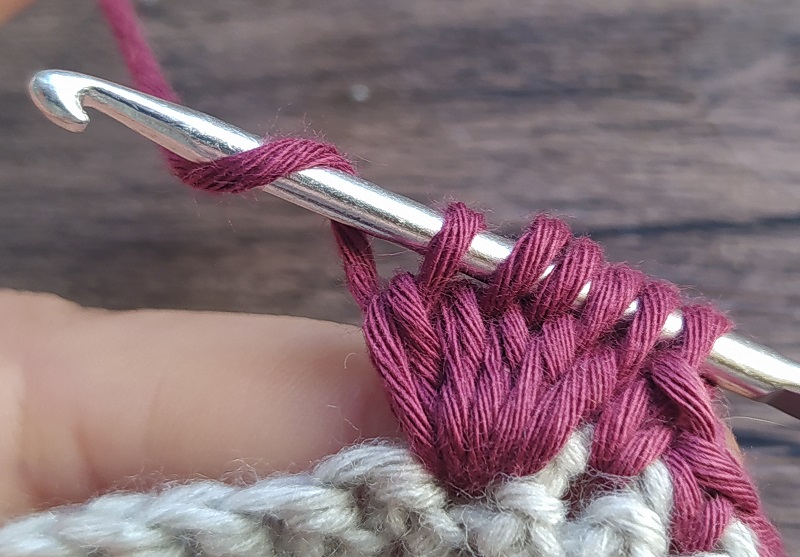
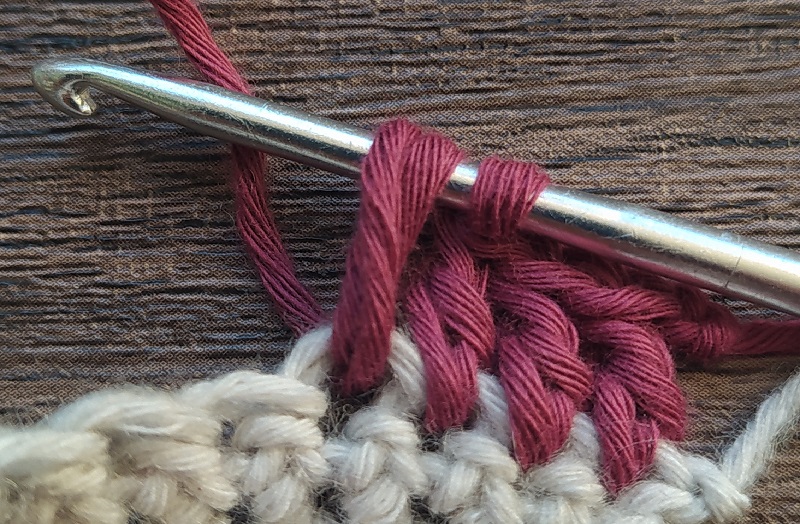
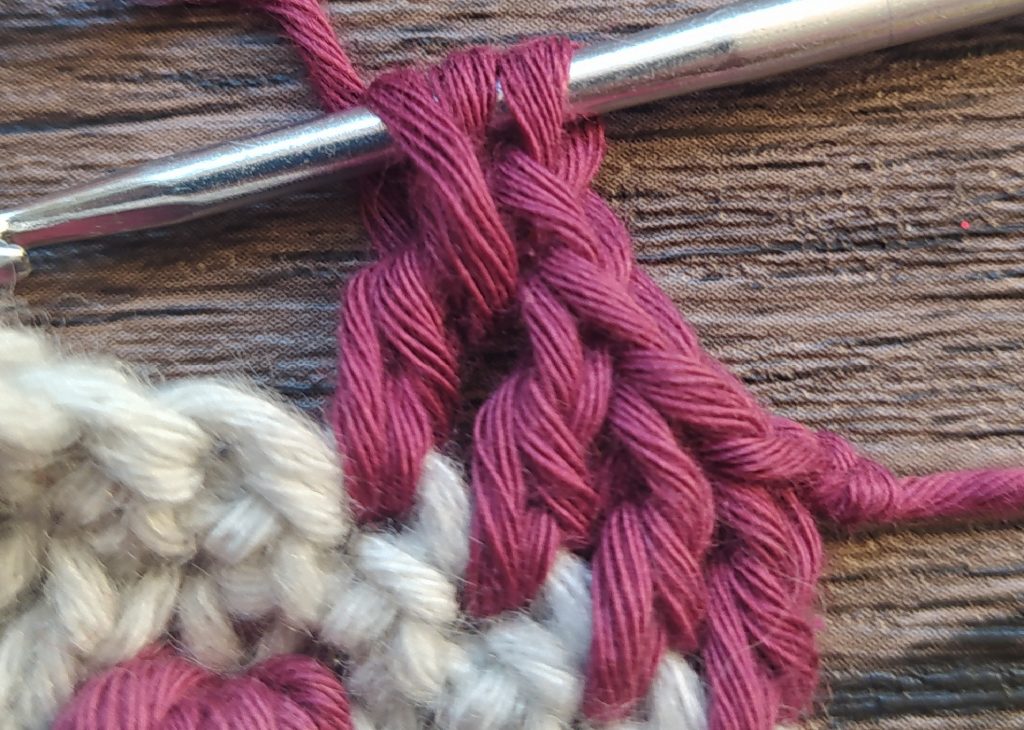
CÓMO HACERLO: Lazada, introduce el ganchillo en el punto base, pasa el hilo por el punto, lazada y pasa el hilo por las 2 lazadas del ganchillo; se ha completado un punto alto sin terminar y quedan 2 loops en el ganchillo.
En el mismo punto base, repite el paso anterior otras 5 veces. Deberías tener 6 lazadas en el ganchillo. Para finalizar, vuelve a pasar el hilo por las 6 lazadas del ganchillo.
Y se ha completado un punto piña 5 puntos altos.
Para tejer un punto piña, debes cerrar a medias varios puntos trabajados en la misma puntada base y luego unirlos para terminar el punto. Pruea a hacer un punto piña de 3, 4 o 5 puntos altos, depende de lo que quieras lograr.
HOW TO MAKE IT: Yarn over (yo), insert the hook in the stitch, yarn over, draw the yarn through the stitch, yarn over, and draw the yarn through the 2 loops on the hook.
One half-closed double crochet is complete, and 2 loops remain on the hook. In the same base stitch, repeat the preceding step four more times. You should have 6 loops on your hook.Yarn over and draw the yarn through all 6 loops on the hook.
One 5-double-crochet bobble stitch is complete.
To crochet a bobble stitch, you half-close several stitches worked in the same stitch and then join them together to finish the stitch. Try your hand at making a 3, 4 or 5-double-crochet bobble stitch.
TO CONSIDER/ CONSIDERACIONES
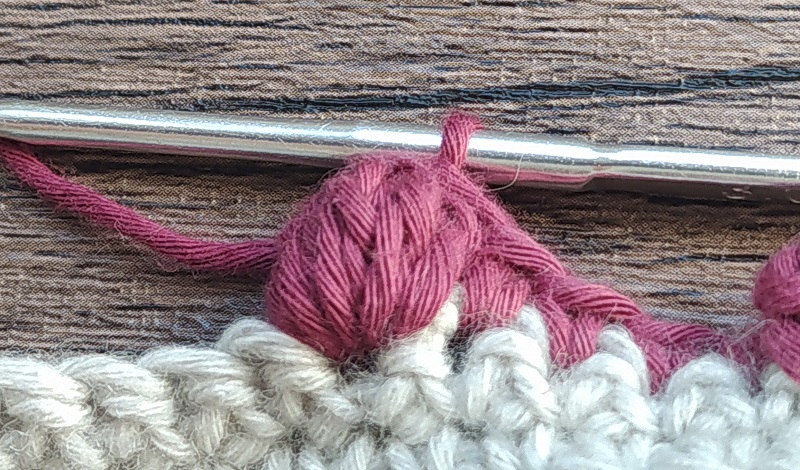
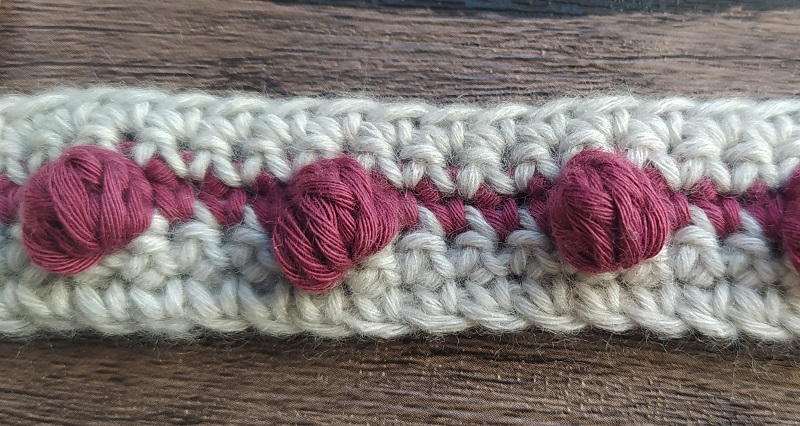
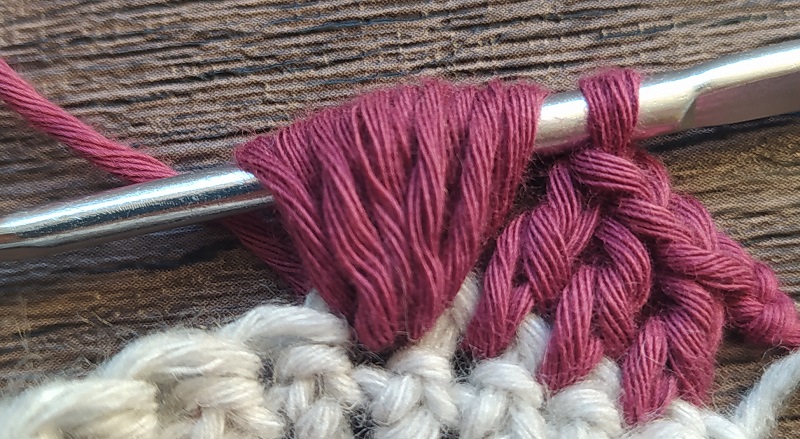
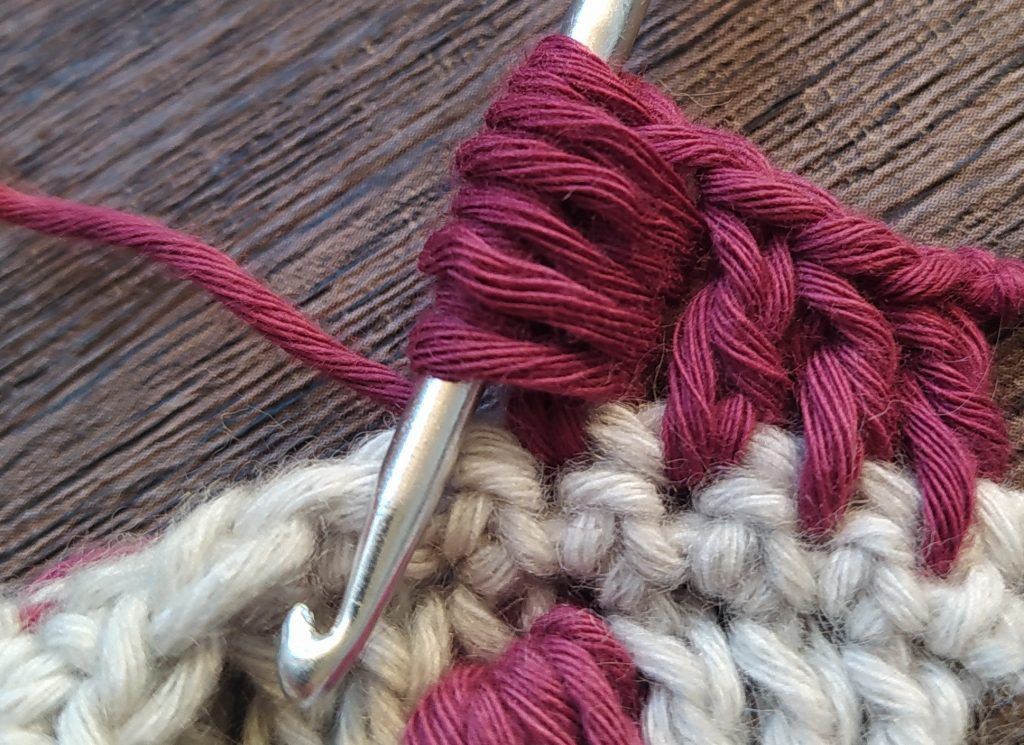
- Ambas puntadas son como un óvalo bien redondeado y compacto que sobresalen del tejido. Tardan un poco más en hacerse que otras puntadas, pero creo que el esfuerzo vale la pena.
Cuando empezaba en mi vida de crochetera, a menudo me frustraba porque quería crear puntadas grandes y bien rellenitas pero éstas nunca «sobresalían» lo suficiente, se veían planas y siempre me preguntaba qué estaba haciendo mal…
Pues bien, estas 2 puntadas tienen un pequeño detalle a tener en cuenta si quieres adherir una mejor textura a tu proyecto: Siempre debes trabajar las puntadas «gorditas» con un punto un poco más grande que el punto base, es decir, si estás tejiendo tu tejido en punto bajo, tu punto pop o piña debe ser trabajado en punto alto. Si estás tejiendo tu tejido base en punto alto, tu punto pop o piña debe estar en punto doble alto, y así sucesivamente…
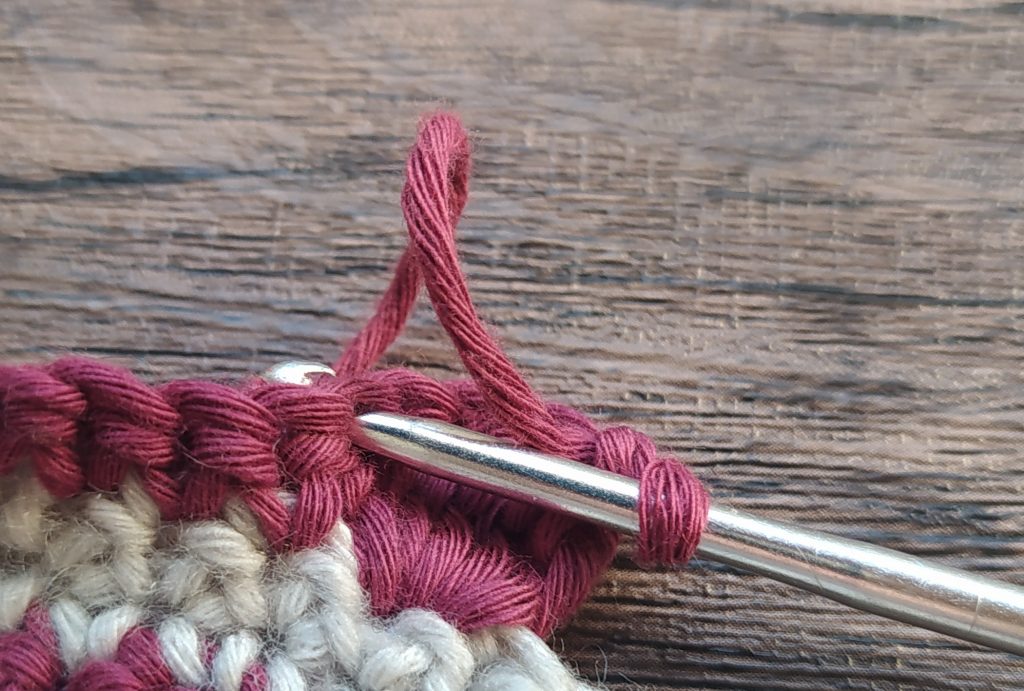
Así logramos que el punto tenga protagonismo y sobresalga del tejido. - Otro problema muy común cuando hacemos punto piña en este caso, es que queda el punto un poco suelto de arriba. Especialmente la lazada superior del primer punto que has hecho. Una de las mejores cosas de estos puntos es su forma ovalada y nítida con una gran textura de punto en el centro. Pero a veces no se consiguen cerrar bien en la parte superior y luego cuando queremos trabajar la siguiente fila y tienes que tejer sobre este punto, a veces queda un agujero muy feo. Si has tejido este punto sabes a lo que me refiero. Para evitar esto intenta utilizar un gancho que no se ensanche, que el mango sea del mismo ancho a lo largo. Pero a veces, incluso con un ganchillo de mango plano, la lazada crece cuando tomas el ganchillo para recoger las lazadas y trabajarlas. Así que presta especial atención a este primer loop o bucle y trata de mantenerlo apretado.
- Estas puntadas se trabajan por el derecho del tejido generalmente, aunque puedes trabajarlos desde ambos lados también, empujando los puntos hacia el lado en el que quieres que se vean.
- Both stitches are a well-rounded, compact oval protruding from the fabric. They take a little longer to make than other relief stitches, but are well worth the effort.
When I was just starting out in my crocheting life, I often got frustrated because I intended to create big stitches but these stitches never «stuck out» enough…
Well, these 2 stitches have a small detail to consider if you want to adhere a better texture to your project: You should always work the «chubby» stitches with a stitch a little bigger than the base stitch, i.e. if you are crocheting your fabric in single crochet stitch, your popcorn or bobble stitch should be worked in double crochet stitch. If you are crocheting your fabric in double crochet stitch, your popcorn or bobble stitch should be in treble crochet stitch, and so on… - A very common problem when we’re crocheting bobbles stitches in this case, is the top finished stitch being too loose. Specially the top loop of the first sistch that you made. One of the best things about bobbles is the crisp oval shape with great stitch texture in the middle. But they’re not being able to close the bobble tightly at the top and then when we’re working the next row and you have to crochet over this stitch, sometimes it left a hole very ugly. If you have crocheted a bobble you know what I mean. To avoid this try to use a hook that does not widen at the shaft. But sometimes even with a hook with a flat shaft, your loop will grow when you manipulate the hook to pick up loops and work them off the hook. So pay special attention to this loop and try to keep it tight.
- These stitches are generally worked on the right side of the fabric, although you can also work them from both sides by pushing the stitches to the side where you want them to show.
PUFF STITCH/ PUNTO PUFF o BOBO
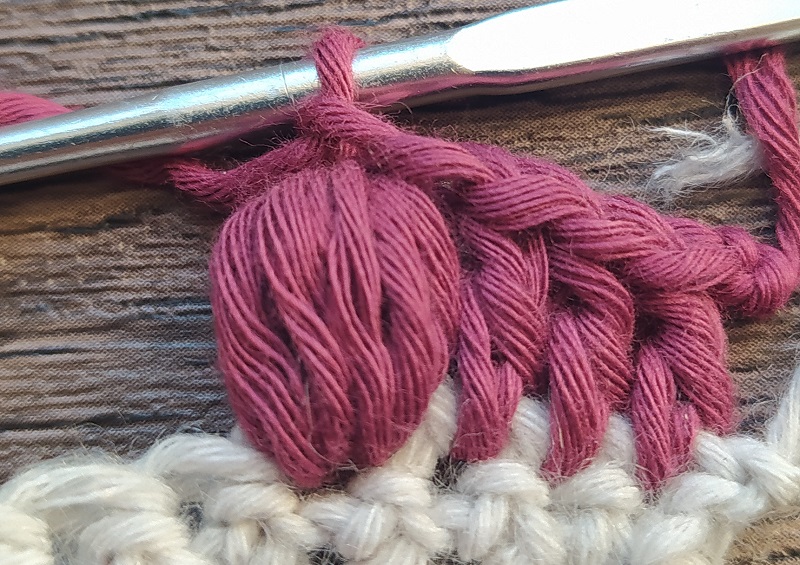
CÓMO HACERLO: A partir del último punto hecho, lazada, inserta el gancho en el siguiente punto, *lazada, inserta el ganchillo en el mismo punto, lazada y pásala por el punto base* repit** 3 veces más, hasta que tengas 11 lazadas en el ganchillo, lazada y pasa el hilo por todas las lazadas del ganchillo. Por último, con el bucle pasado por el punto puff, haz una sola cadena. Esto asegura el punto, lo mantiene más erguido y crea el espacio para trabajar en la siguiente fila.
HOW TO MAKE IT: From the last stitch made, yarn over, insert hook in next st, *yarn over, insert your hook through the same stitch, yarn over, and then draw up another loop, rep* 3 more times, you shlud have 11 loop on the hook, yarn over and draw the yarn through all loops on your hook. Finally with the loop pulled through the puff stitch, make a single chain. This secures the puff stitch, keeps the stitch more upright, and creates the space to work into on the next row.
PUFF ST VARIATION/ VARIACIÓN DEL PUNTO PUFF O BOBO

CÓMO HACERLO: Este punto se trabaja exactamente igual que el punto puff que acabamos de ver, con la única diferencia de que se trabaja alrededor del último punto alto realizado.
Esta forma de trabajar crea el punto con una vista horizontal a diferencia del punto anterior que deja una vista vertical.
HOW TO MAKE IT: This stitch is worked in exactly the same way as the puff stitch we have just seen, the only difference being that it is worked around the last double crochet stitch made.
This way of working creates the stitch with a horizontal view as opposed to the previous stitch which leaves a vertical view of the stitches.
TO CONSIDER/ CONSIDERACIONES
- Estas dos últimas puntadas, a diferencia de las primeras dos, no necesitan ser trabajas con una altura mayor a la del tejido base ya que la escencia de estas, es ser tabajas con puntos altos.
- ¿Quieres que tus puntos de puffs sean un poco más altos o un poco más pequeños? La tensión en estos puntos es fundamenta y debes poner atención en ello si quieres ejecutarlas de la mejor manera. Aleja o acerca el gancho al tejido mientras subes todas las lazadas. Esto hace que el punto quede más suelto si lo alejas, dándole más altura; y lo hace más apretado y pequeño si lo acercas al tejido.
- Si quieres, puedes realizar estos puntos desde el revés del tejido. Esto significa que las puntadas se alejarán de ti y podrán verse por ambos lados de tu tejido, dependiendo de tu punto de vista.
- These last two stitches, unlike the first two, do not need to be worked higher than the base stitch, as the essence of these stitches is to be worked with double crochet stitches.
- Do you want your puff stitches to be a little higher or a little smaller? Move the hook away from or closer to the work as you pull up all the loops. This makes the stitch looser if you move it away, giving it more height; and makes it tighter and smaller if you move it closer.
- If you want, you can work these stitches from the wrong side of the work. This means that the stitches will move away from you and can be seen on both sides of your fabric, depending on your point of view.
OVERVIEW/ GENERALIDADES
Una de las cosas más sorprendentes del crochet es la cantidad de puntos que existen, su versatilidad, su dinamismo y su vasto mundo. Por supuesto, esto puede hacer que a veces sea difícil identificar los puntos. Uno de los cruces más comunes es el que se produce entre el punto popcorn, piña o el punto puff. Estas puntadas, diseñadas para crear un relieve en la tela, son divertidas, atractivas y un poco difíciles de distinguir.
Por eso hay que recordar que no todas las puntadas pop – piña – puff son iguales, a veces trae disputas entre tejedoras por quién tiene el nombre correcto jajaja pero creo que más importante que el nombre, es cómo se realizan así que presta atención a las instrucciones de cualquier patrón que estés utilizando para asegurarte de que estas instrucciones forman parte de la variación que estás trabajando o si tu estás escribiendo un patrón, asegúrate de escribir detalladamente cómo se hace el punto.
Así que cuentame qué te ha parecido este post, si conocías estos puntos o por cuántos otros nombres los conocías. Gracias por leer, Yess.
One of the amazing things about crochet is just how many stitches there are, its versatility, dinamic and vast world. Of course, this can make it tricky to identify stitches sometimes. One of the most common crossovers is between the puff stitch, bobble stitch and popcorn stitch. All designed to create a raised, bump on the fabric, these stitches are fun, attractive and all a little difficult to tell apart!
So remember that not all puff – pop – bobble stitches are the same, sometimes there are disputesamong crocheters about who has the right name hahaha but I think more important than the name, is how they are made so pay attention to the instructions of any pattern you are using to make sure these instructions are part of the variation you are working on or if you are writing a pattern, make sure you write down in detail how the stitch is made.
So let me know what you thought of this post, if you knew these stitches or by how many other names you knew them by. Thanks for reading, Yess.