FADE EN CROCHET
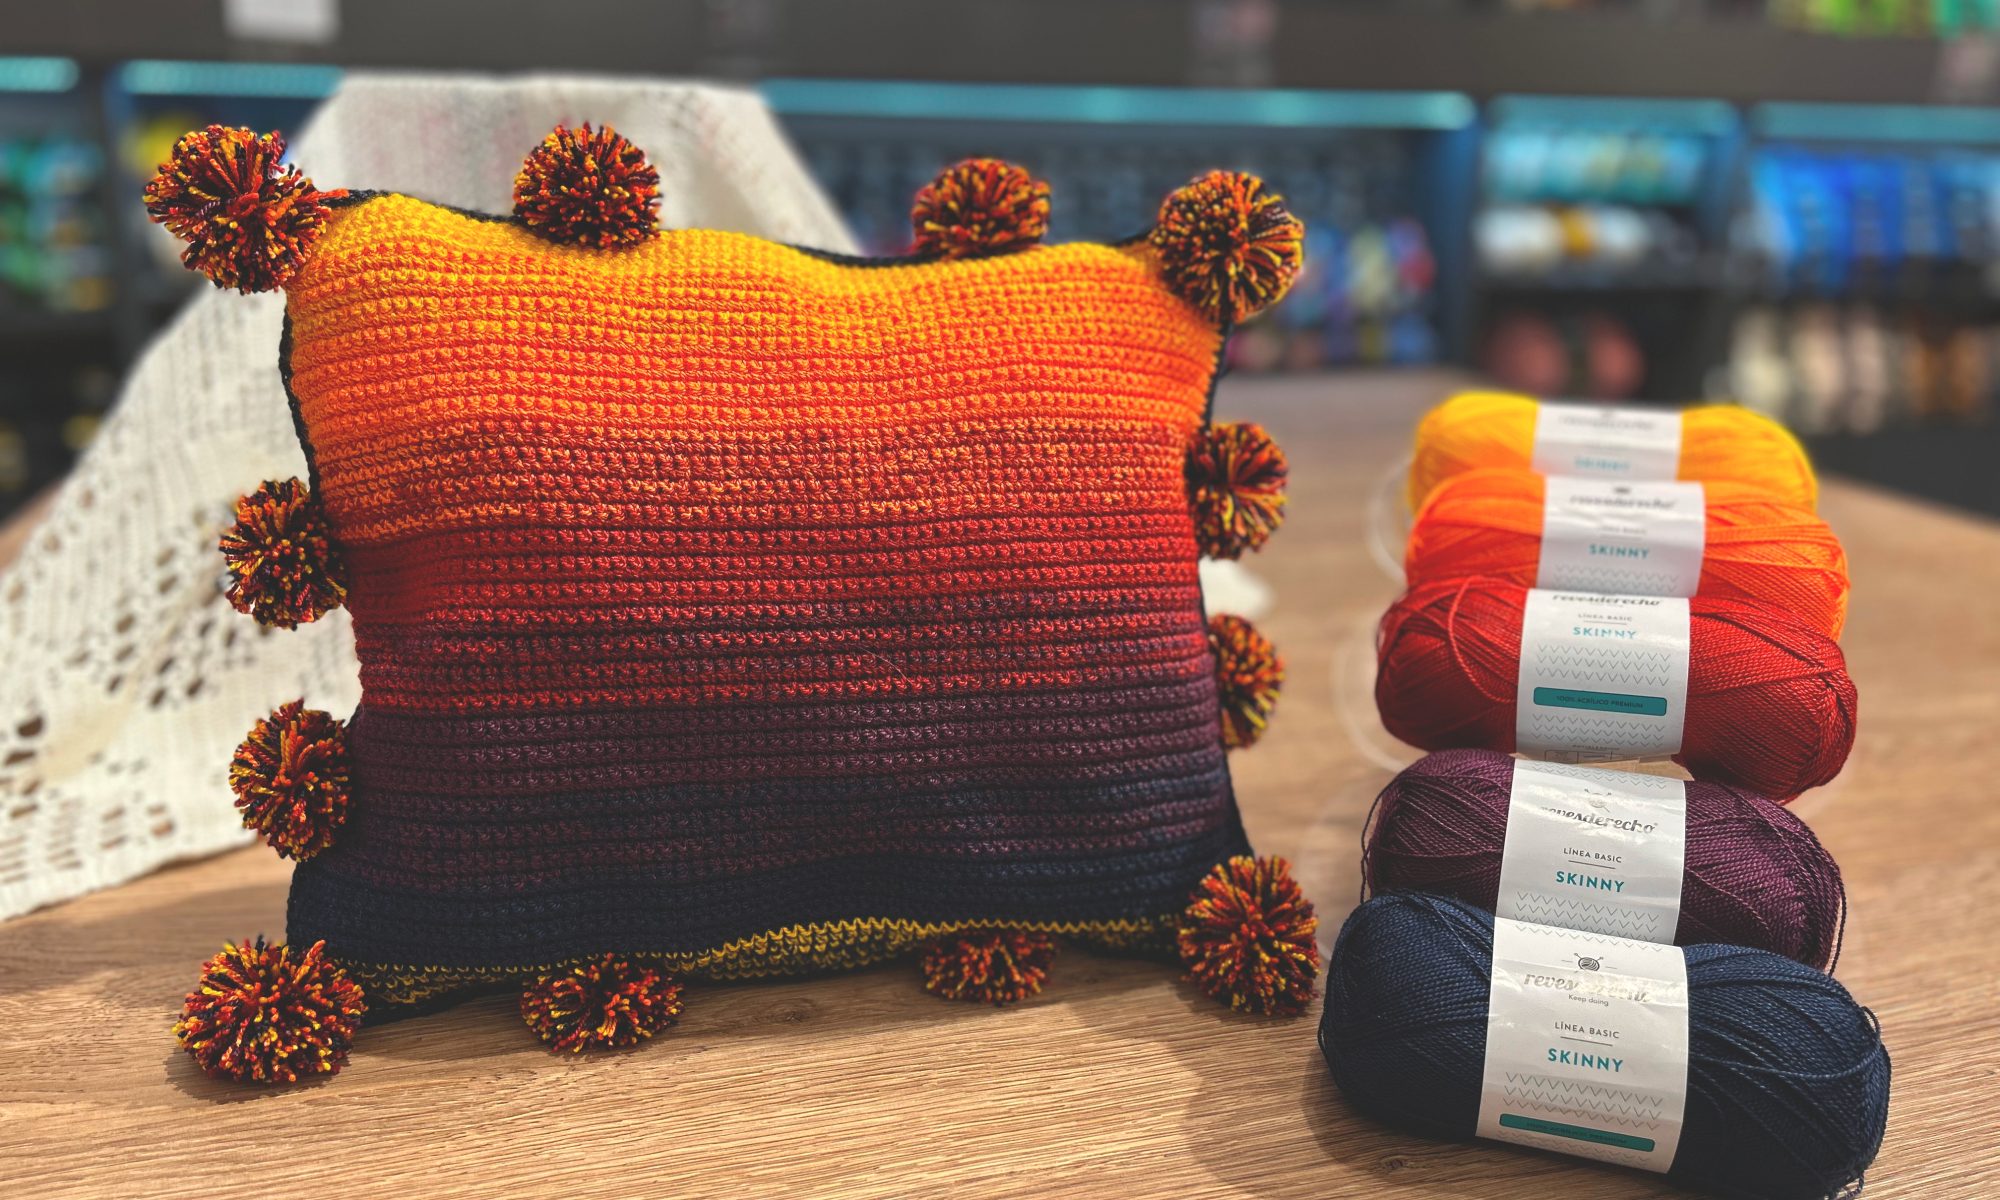
Hola queridxs Anandinis <3 Retomando un poco el blog, creí que sería bueno hablarles sobre una técnica de color que amo, y que estoy segura que les encantará y no sólo eso, porque además de contarles de qué se trata, también les enseñaré cómo se hace con un lindo, corto y decorativo proyecto ara tu hoga, ¿No es genial? ¿Estamos listxs?
Primero que todo, es importante saber qué significa esto de «fade», ¿de dónde salió?
El fade en crochet, también conocido como «degradado» en español, se refiere a una técnica de tejer que implica la transición gradual de un color a otro en una prenda de crochet utilizando colores sólidos (es decir, colores que son de un sólo tono y no tienen ningún tipo de matizado).
Para crear un fade en crochet, se pueden utilizar varios métodos, pero uno común es trabajar con hilos de diferentes tonalidades o colores en una misma fila o ronda. Por ejemplo, si se está tejiendo un chal triangular, se puede comenzar con un color sólido en la primera fila y, a medida que se avanza, ir agregando hilos de otros colores para crear un degradado.
También se puede utilizar el método del cambio de color para crear un fade. En este caso, se cambia de color en puntos específicos de la prenda, creando una transición suave de un color a otro. Este método se puede utilizar para tejer cualquier prenda, desde bufandas hasta mantas.
Una de las ventajas del fade en crochet es que permite crear piezas únicas y personalizadas que se adaptan a cualquier estilo o gusto personal. Además, es una técnica relativamente sencilla que se puede aprender con práctica y experimentación.
Hello dear Anandinis <3 Taking up the blog a bit, I thought it would be nice to tell you about a colour technique that I love, and that I’m sure you’ll love and not only that, because besides telling you what it is, I’ll also show you how to do it with a nice, short and decorative project for your home, isn’t it great? Are we ready?
First of all, it’s important to know what this «fade» means, where did it come from?
Crochet fade, also known as «degradado» in Spanish, refers to a crocheting technique that involves the gradual transition from one colour to another in a crochet garment using solid colours (i.e. colours that are a single tone and do not have any shading).
To create a fade in crochet, several methods can be used, but a common one is to work with yarns of different shades or colours in the same row or round. For example, if you are working a triangular shawl, you can start with a solid colour in the first row and, as you go along, add yarns of other colours to create a gradient.
You can also use the colour change method to create a fade. In this case, you change colour at specific stitches on the garment, creating a smooth transition from one colour to another. This method can be used to work anything from scarves to blankets.
One of the advantages of crochet fade is that it allows you to create unique and personalised pieces to suit any style or personal taste. It is also a relatively simple technique that can be learned with practice and experimentation.
¡EMPECEMOS!
PASO 1: MATERIALES
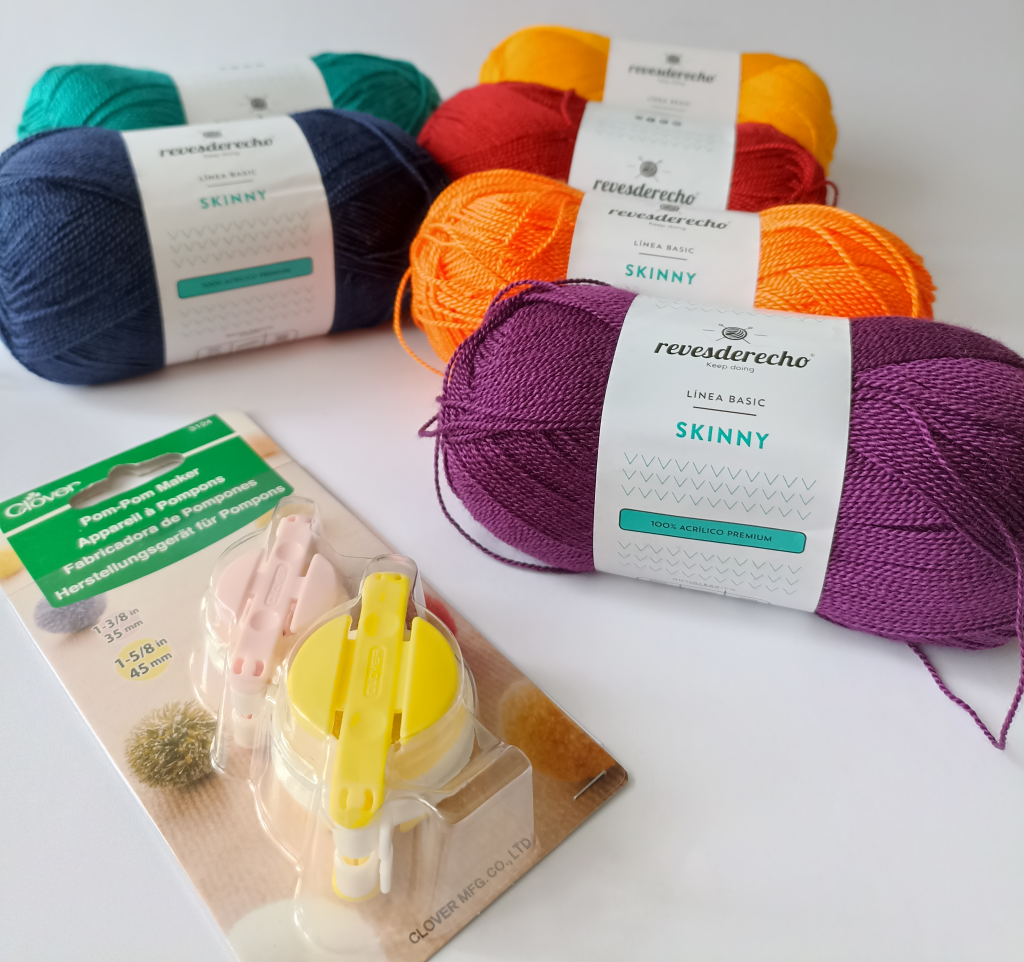
- El grosor de los materiales es muy importante en este aspecto, ya que trabajaremos co doble hebra, por lo que el grosor debe ser bastante delgado: entre light fingering y fingering (imagina que si trabajas con un grosor mayor, el tejdio quedará con puntadas gigantes y muy duro, nada confortable para el uso)
Utilicé 5 colores sólidos de la marca revesderecho, línea basec «skinny». A continuación les dejo los códigos de los colores por si quisieran hacer uno con los mismos colores:
Color amarillo oro: 0828 / lote 07
Color naranjo fuerte: 0033/ lote 09
Color rojo italiano: 3602/ lote 12
Color uva claro (morado): 0712 / lote 07
Color azul marino: 6210
2. También necesitarás algo con qué hacer pompones. Si puedes conseguir esta máquina-super-super-hacedora-de-pompones, ¡Genial! si no, puedes hacerlo a la vieja usansa ¡todo sirve! (Además, al final de este blog, te dejo un minitutorial de cómo utilizarlo)
The weight of the yarn is very important in this aspect, as we will be working with double strands, so the thickness must be quite thin: between light fingering and fingering (imagine that if you work with a thicker material, the fabric will have giant stitches and will be very hard, not comfortable to use).
I used 5 solid colours. Here are the colour codes in case you would like to make one with the same as me:
Golden yellow
Strong orange colour
Italian red colour
Purple colour
Navy blue colour
2. You will also need something to make pom-poms with. If you can get your hands on this super-pom-pom-machine, great! If not, you can do it the old-fashioned way, anything goes! (Also, at the end of this blog, I leave you a mini tutorial on how to use it).
PASO 2: ORDENAR LOS COLORES Y HACER MINI OVILLITOS
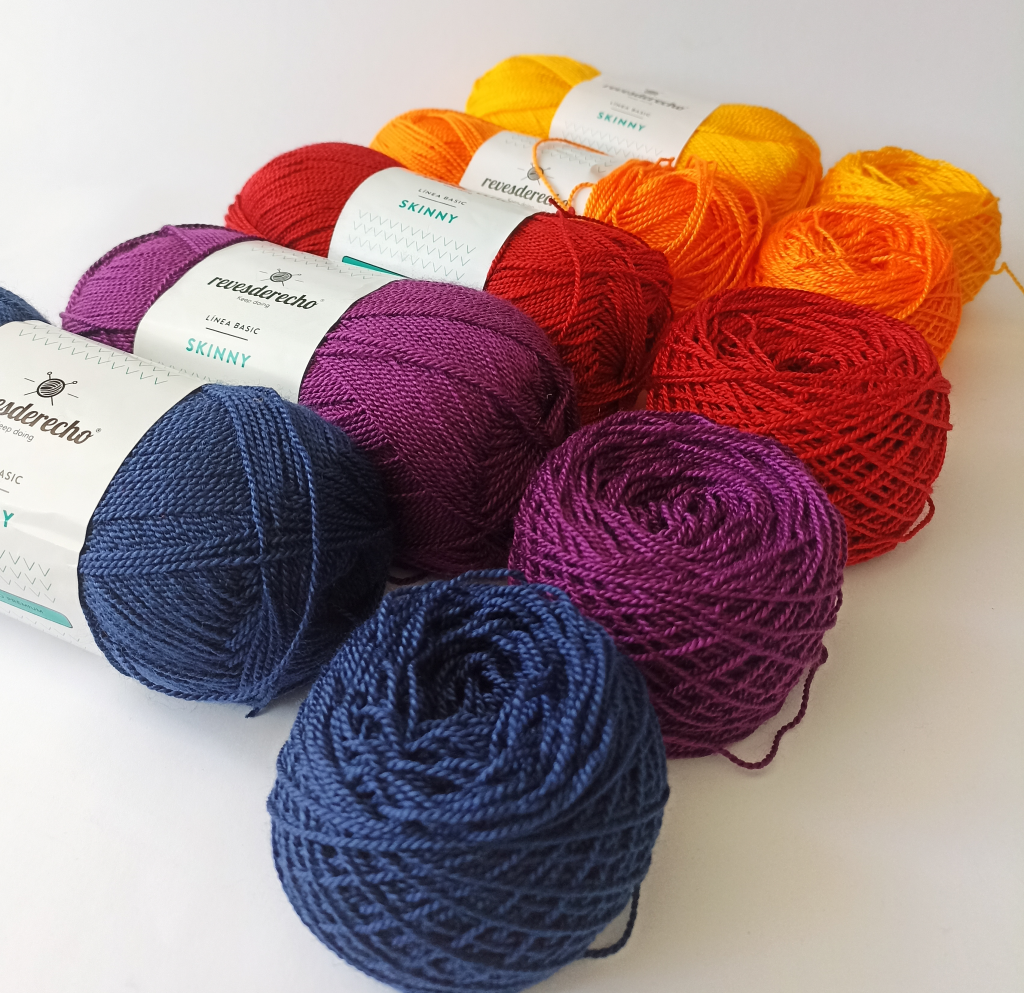
MINI OVILLOS: Para hacer los mini ovillos es tan simple como sacar la hebra del medio del ovillo o de afuera. Los míos fueron hechos con ovilladora por lo que quedaron bien armaditos 🙂 hacerlos bolita también sirve. No ocupen otro ovillo nuevo, ya que utilizarán pocos metros de cada color
MINI YARNS: To make the mini balls it’s as simple as pulling the strand from the middle of the ball or from the outside. Mine were made with a balling machine, so they were well assembled 🙂 making them in a ball is also useful. Don’t need a new ball, as you will use only a few metres of each colour.

ORDEN DE COLORES: Aquí es super importante que interiorices, observes y elijas el orden de los colores a trabajar. Siempre los colores tienen un orden previsto y tendrás que encontrar el orden de los colores que eligas.
Si no eres tan experta con los colores, te dejo esta pequeña ayuda que seguro te servirá a la hora de encontrar el orden adecuado
ORDER OF COLOURS: Here it is very important that you internalise, observe and choose the order of the colours to work with. The colours always have an order and you will have to find the order of the colours you choose.
If you are not so expert with the colours, I leave you this little help that will surely help you to find the right order.
PASO 3: DEFINIR ORDEN Y TEJER
Ahora vamos a lo práctico. Recuera que siempre tejeremos con dos hebras, a veces tejeremos con dos hebras del mismo color, otras veces con dos hebras de distinto color.
Yo definí el orden de mis colores, a continuación, los clasificaré en número a trabajar:
Color amarillo: C1
Color naranjo: C2
Color rojo:C3
Color morado:C4
Color azul marino: C5
Remember that we will always weave with two strands, sometimes we will weave with two strands of the same colour, sometimes with two strands of different colours.
I defined the order of my colours, then I will classify them in number to work with:
Yellow colour: C1
Orange colour: C2
Red colour: C3
Purple colour: C4
Navy blue colour: C5
¡Tejamos!
Urde 70 cad
De la ronda 1 a la 7: 70 pb
Hebra 1: C1,
Hebra 2: C1
De la ronda 8 a la 14: 70 pb
Hebra 1: C1
Hebra 2: C2
De la ronda 15 a la 21: 70pb
Hebra 1: C2
Hebra 2: C2
Set up ch70
Round 1 to 7: 70sc
Strand 1: C1
Strand 2: C1
Round 8 to 14: 70sc
Strand 1: C1
Strand 2: C2
From round 15 to 21: 70sc
Strand 1: C2
Strand 2: C2
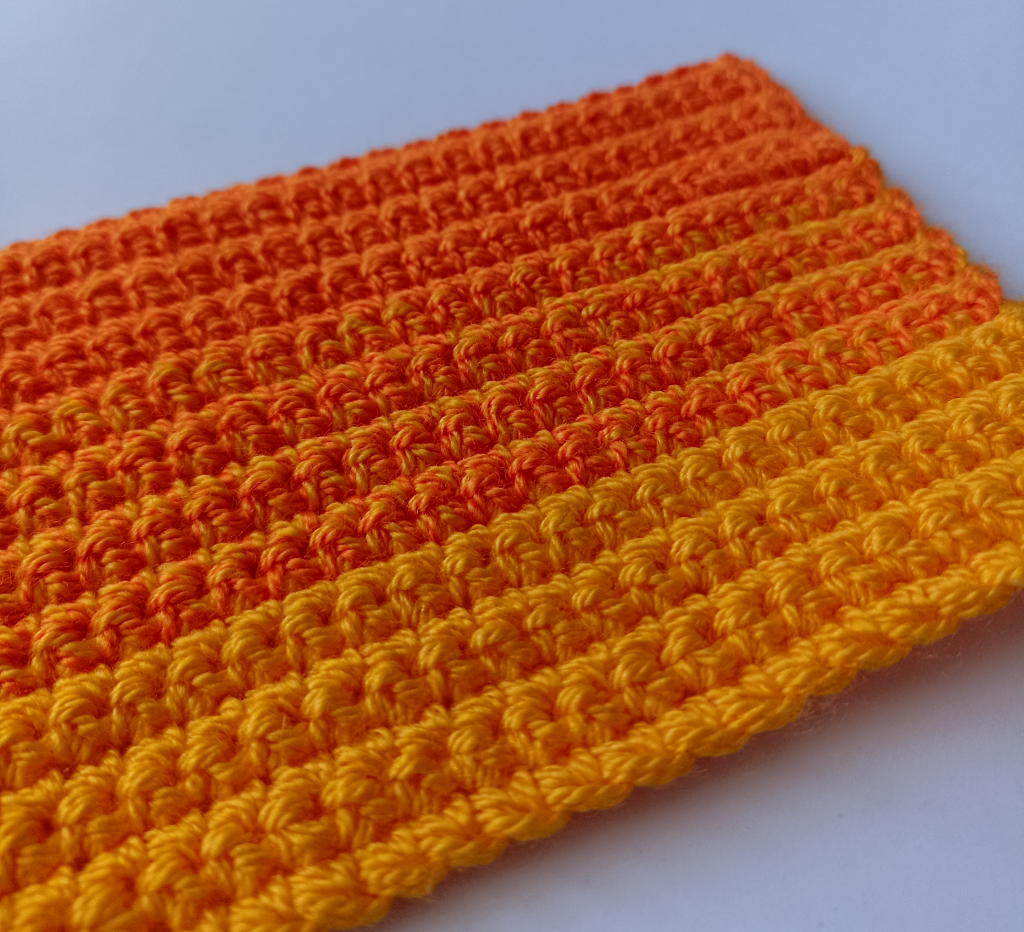
al terminar cada panel de color, puedes rematar para comenzar con las 2 nuevas hebras, al final del tejido sólo tendrás que entrar hebras.
at the end of each colour panel, you can fasten off to start with the 2 new strands, at the end of the project you will only need to weave in ends
De la ronda 22 a la 28: 70 pb
Hebra 1: C2
Hebra 2: C3
Round 22 to 28: 70sc
Strand 1: C2
Strand 2: C3
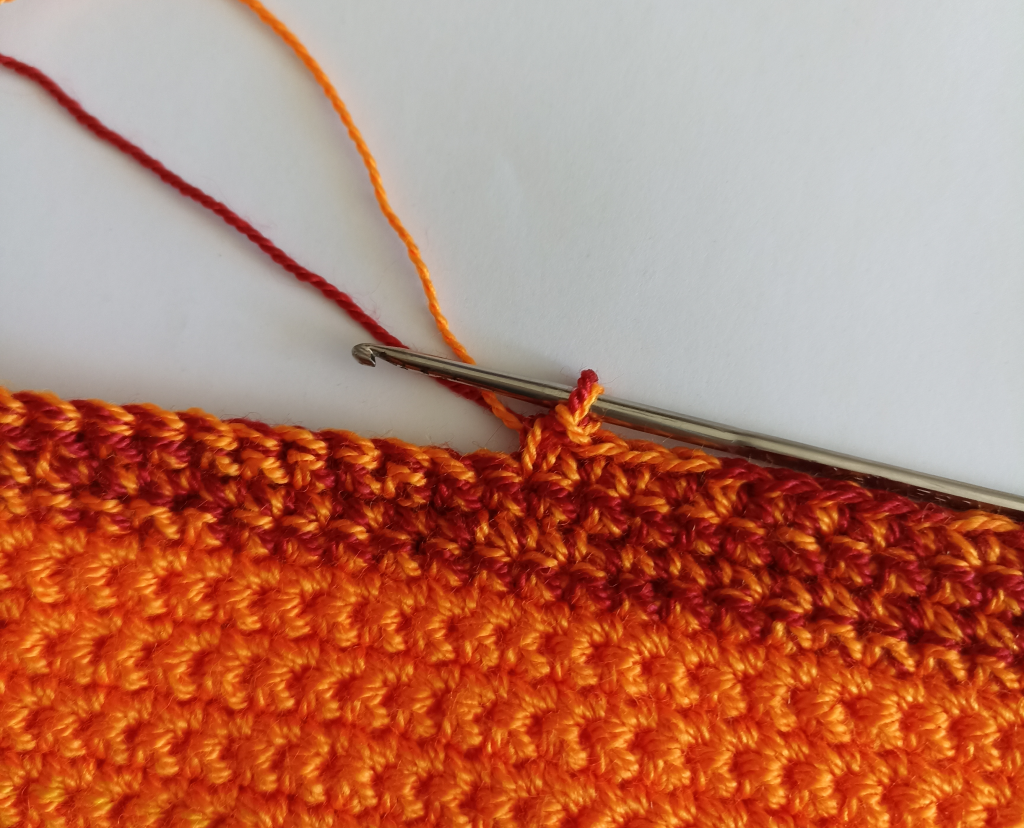
De la ronda 29 a la 35: 70 pb
Hebra 1: C3
Hebra 2: C3
De la ronda 36 a la 42: 70 pb
Hebra 1: C3
Hebra 2: C4
De la ronda 43 a la 49: 70pb
Hebra 1: C4
Hebra 2: C4
De la ronda 50 a la 56: 70 pb
Hebra 1: C4
Hebra 2: C5
De la ronda 57 a la 63: 70 pb
Hebra 1: C5
Hebra 2: C5
De la ronda 64 a la 70: 70pb
Hebra 1: C5
Hebra 2: C1
Round 29 to 35: 70sc
Strand 1: C3
Strand 2: C3
Round 36 to 42: 70sc
Strand 1: C3
Strand 2: C4
From round 43 to 49: 70sc
Strand 1: C4
Strand 2: C4
Round 50 to 56: 70sc
Strand 1: C4
Strand 2: C5
Round 57 to 63: 70sc
Strand 1: C5
Strand 2: C5
From round 64 to 70: 70sc
Strand 1: C5
Strand 2: C1
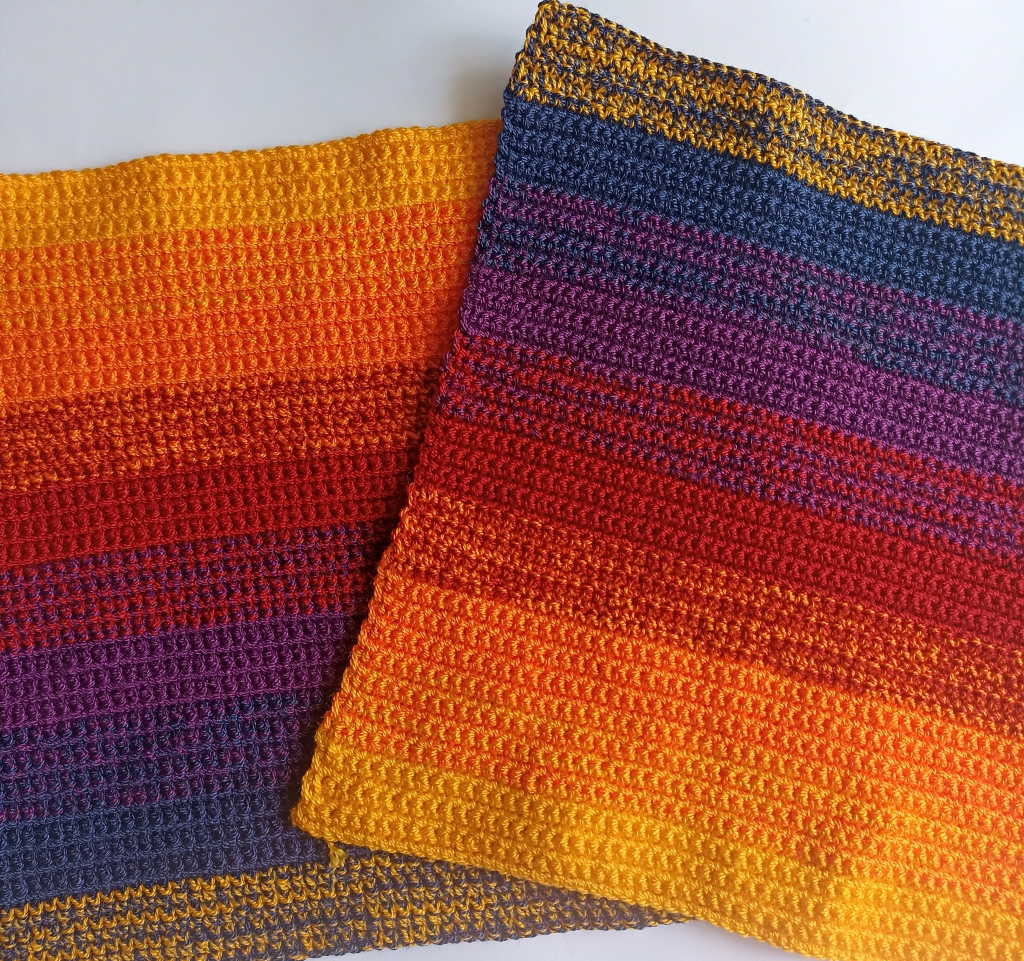
Cuando termines una pieza, repites otra igual. Ahora sólo nos queda unir ambas piezas.
When you have finished one piece, repeat the same piece. Now all that remains is to join the two pieces together.
ANTES DE UNIR, HAZ LOS POMPONES
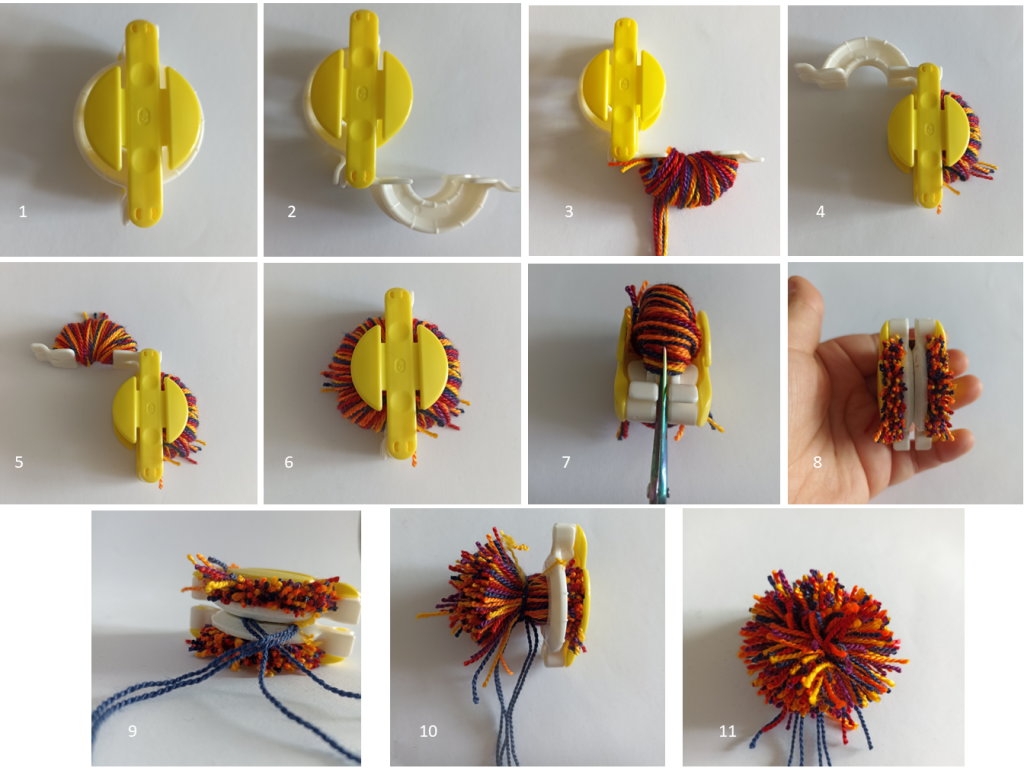
Los pompones pueden ser hechos de un sólo colores o de muchos. En mi caso hice con los 5 colores que utilicé. Lo demás depende de ti.
Primero te darás cuenta que esta herramienta tiene 2 mitades. En la foto 1 puedes ver 1 mitad. Cada mitad se subdivide en 2 «ganchos» que se abre en direcciones opuestas.
Con esto en mente, abres un gancho (foto 2), enrollas los hilos (foto 3), vuelves a dejar en gancho en su posición inicial, abres el otro gancho (foto 4), enrollas los hilos (foto 5), vuelves a dejar el gancho en su posición inicial (foto 6). Lo gira y justo en medio de ambas mitades queda un división donde metes la punta de la tijera y comienzas a cortar (foto 7, la tijera debe tener una punta fina, de lo contrario no entrará), una vez que hayas cortado te quedará como en la foto 8 por ambos lados. Tomas un hilo aparte y lo enrollas por la división de ambas mitades (foto 9) y lo anudas muy bien. Tomas ambas mitades y las separas. En la foto 10 verás que ya no hay una mitad, entonces sólo queda sacar la otra. Y finalmente te quedará el pompom que tendrás que detallar cortando algunos hilos largos.
Unión
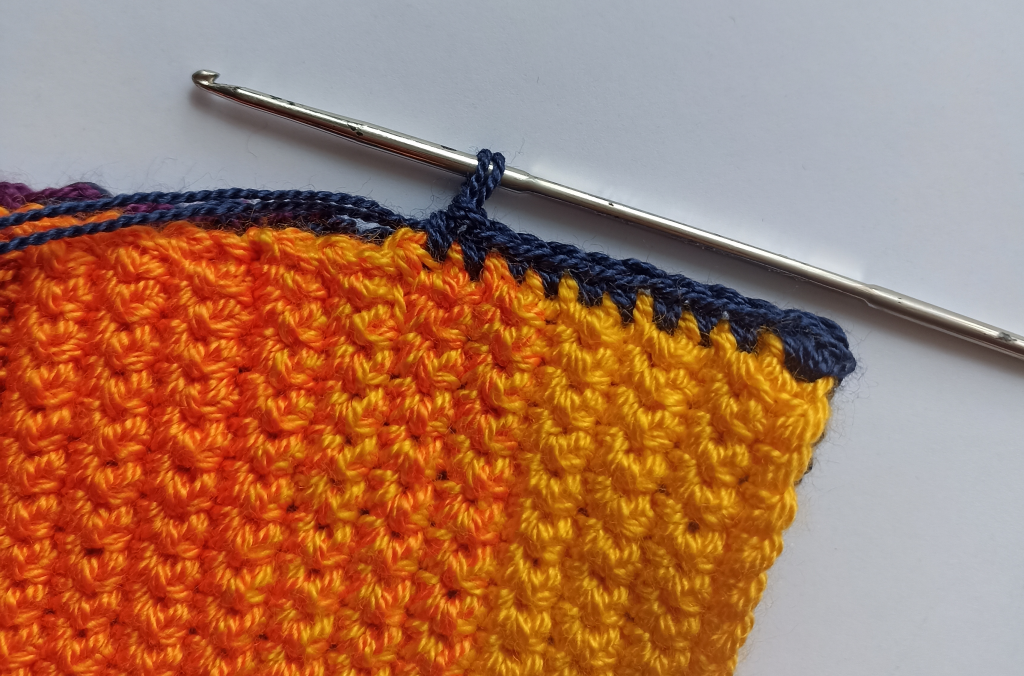
Junta ambas mitades. Con el color de tu preferencia y con 2 hebras, teje un punto bajo en cada fila y cada punto alrededor de las piezas.
Join both halves together. With the colour of your choice and 2 strands of yarn, work 1 single crochet in each row and each stitch around.
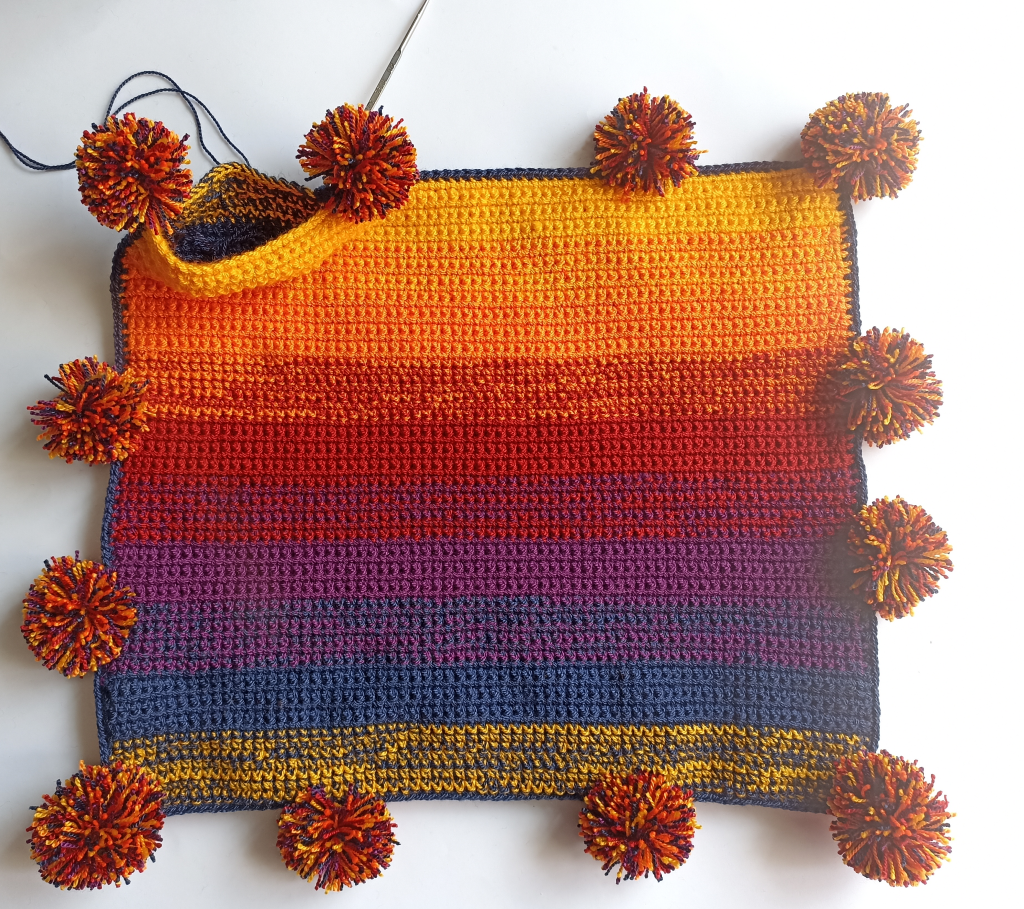
Antes de cerrar completamente el cojín, une los pompones en el orden que más te guste. Puedes ser simplemente con un nudo o alguna otra técnica de tu elección, de esta manera puedes llevar las hebras hacia el revés del tejido. Una vez unidos los pompones, rellénalo y cierra completamente.
Before closing the cushion completely, join the pompoms together in the order you like. This can be simply with a knot or some other technique of your choice, this way you can bring the strands to wrong side. Once the pompoms are joined, stuff it and close it completely.
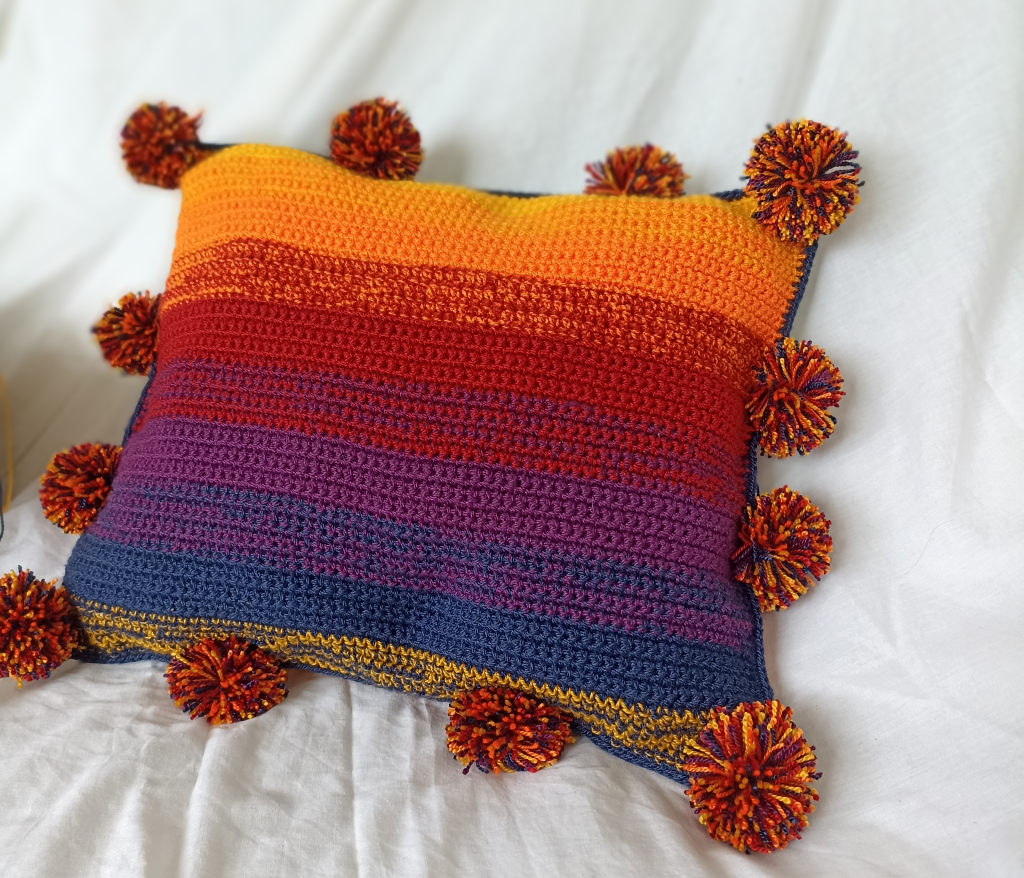
¡Y ya está listo para usar!
PUNTADAS
¿Son importantes las puntadas al momento de crear un fade?
¡Claro! Dependiendo de la puntada que utilices, el fade tomará mayor o menor «naturalidad». Por ejemplo, hoy les enseñaré un proyecto con puntos bajos, y al ser puntos cortos, el fade tendrá mucho más realismo que si lo hacemos con puntos altos. Otro ejemplo es tejer un fade con punto musgo (moss stitch). En este caso, no habría problema con utilizar incluso una sola hebra, ya que como se van intercalando las puntadas, el color en las puntadas dará un efecto de transición más natural.
STITCHES
Are stitches important when creating a fade?
Of course! Depending on the stitch you use, the fade will take on more or less «naturalness». For example, today I will show you a project with low stitches, and as they are short stitches, the fade will have much more realism than if we do it with double crochet stitches. Another example is to work a fade with moss stitch. In this case, there would be no problem with using even a single strand, because the colour in the stitches will give a more natural transition effect.
