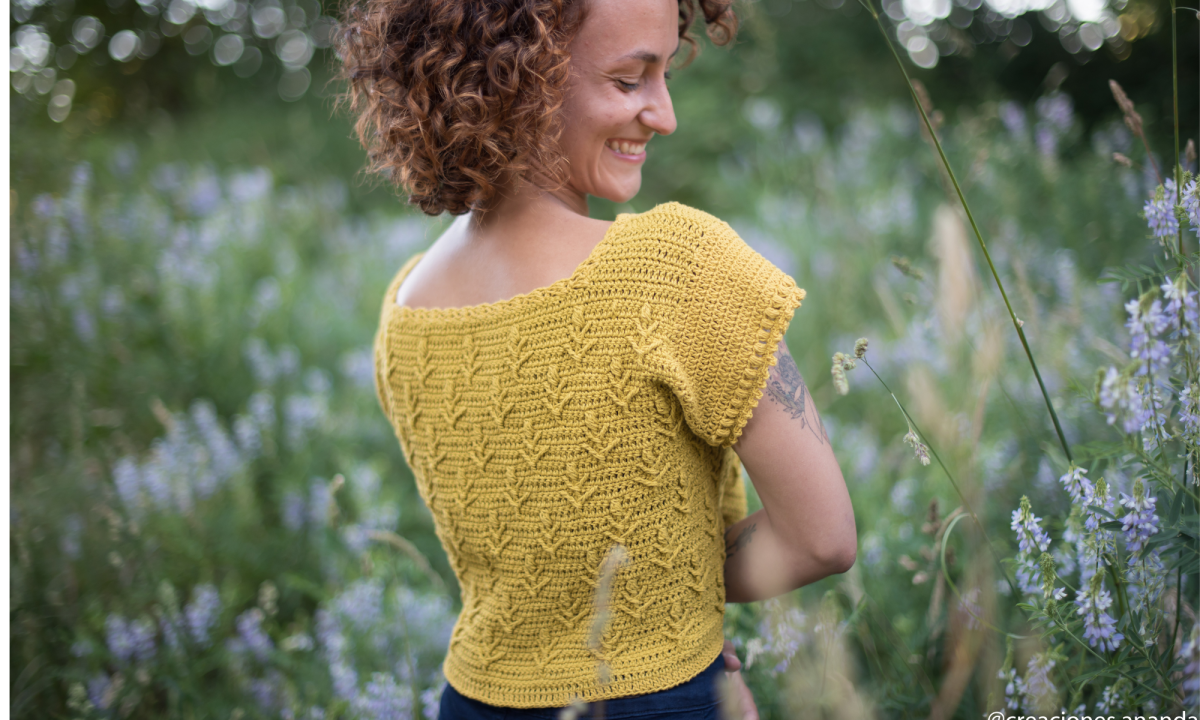
Buen día mi querida comunidad crochetera! Lo que nos reune hoy es un tema muy lindo con un proyecto muy especial.
Hace unos meses atrás me contactó Francisca de @yotejo.cl para contarme sobre una hermosa iniciativa que ella estaba coordinando, a ver si me animaba a participar con un diseño… y yo, claro que sí.
La Campaña es #YoTejoParaTi. Se trata de una iniciativa llena de amor, donde muchas tejedoras hacen gorros y cuellos, para que luego estos sean entregados a personas en situación de calle o que viven en condiciones vulnerables.
Así que me puse manos a la obra y pensé en muchos diseños, puntadas, colores y de repente me vino este diseño: Indra.
Indra es la deidad de los cielos, los rayos, los truenos, las tormentas y las lluvias. Es quien mata el gran mal simbólico, el que obstruye la prosperidad y la felicidad humana (vittra). Indra destruye a Vritra y sus «fuerzas engañosas», y así trae las lluvias y el sol como amigo de la humanidad
Good day dear crocheting community ! Today I want to tell you about a special and amazing project.
Few months ago Francisca from @seteje.cl contacted me to tell me about this beauty aid campaign, and ask me if I wanted to participate in it… and I said yes, of course!
This Campaign is colled #YoTejoParaTi that means «I crochet (or knit) for you», and it’s about that many of us make hats or cowls to homless people or vulnerable situations, here in Chile. but, I imagine that in your country or city you also have solidarity campaigns like these and you can donate it there
So, I got down to work and I thought of many designs, colors and suddenly this design came to me: Indra.
Indra is the deity of the heavens, lightning, thunder, storms and rains. Who kills the great symbolic evil, who obstructs human prosperity and happiness (Vritra). Indra destroys Vritra and his «deceiving forces», and thereby brings rains and the sunshine as the friend of mankind
En un principio pensé en hacer un gorro con puntadas en relieve y toda la parafernalia que eso conlleva, pero luego pensé: Sí es una campaña donde necesitamos muchos gorros, el proyecto debería ser lo más «simple» posible (pero en realidad todo lo que hacemos requiere voluntad y cariño), para que más personas y con distintas habilidades, puedan tejerlo. Busqué cuidadosamente los colores para que combinaran entre sí.
Este gorro se teje de forma plana, es decir, tendrás que trabajar por el revés y derecho en cada fila, luego unirlo para formar un tejido tubular para , posteriormente, unir sólo la parte de arriba. Cómo? ya vamos a ver, les dejaré las instrucciones puntada a puntada, pero también dejaré un mini tutorial de armado del gorro, y otro tutorial para hacer un pompom con lo que sea que tengas en casa.
Yo utilicé un hilado grosor fingering, tú puedes utilizar lo que tengas en casa, la idea es que tejas, así que las instrucciones de este patrón/tutorial serán con medidas aproximadas.
At first I thought of making a hat with raised stitches and all the paraphernalia that goes with it, but then I thought: If it is a campaign where we need many hats, the project should be as «simple» as possible (but realLy, everything we do requires will and love), so that more people with different skills can crochet it. I carefully looked for the colors to match each other.
This hat is crocheted flat, that’s means, you will have to work for right side and wrong side in each row, then join it to form a tubular fabric, and then join only the top part. How?… well, we’ll see, I’ll leave you the instructions stitch by stitch, but I’ll also leave a mini tutorial to assemble the hat, and another tutorial to make a pompom with whatever you have at home.
I used fingering yarn, you can use whatever you have at home, the idea is that you can crochet a hat, so the instructions in this pattern/tutorial will be with approximate measurements.
MATERIALES/MATERIALS
Para el Gorro/ for the hat:
- Hilo de algodón grosor fingering (o el que tengas). 4 colores: 40 gramos / 100mts cada uno.
- 1 crochet de 3 a 4,5mm (depende de tu tension, cuida que no quede demasiado apretado tu tejido)
- Cotton yarn fingering weight (or whatever you have). 4 colors: 40 grams / 100mts / 109 yds each.
- 1 crochet of 3 to 4.5mm (depending on your tension, be careful not to make your crocheting too tight).
Para el pom pom/ for the pom pom
- 15 grs/45 metros de hilo Color 4
- Un cartón
- Tijeras
- un objeto con una circunferencia redonda grande
- Un objeto con una circunferencia redonda más pequeña.
- 15 grams/45 meters /49 yds of yarn Color 4
- A cardboard
- A scissor
- An object with a larger circumference
- An object with a smaller circumference.
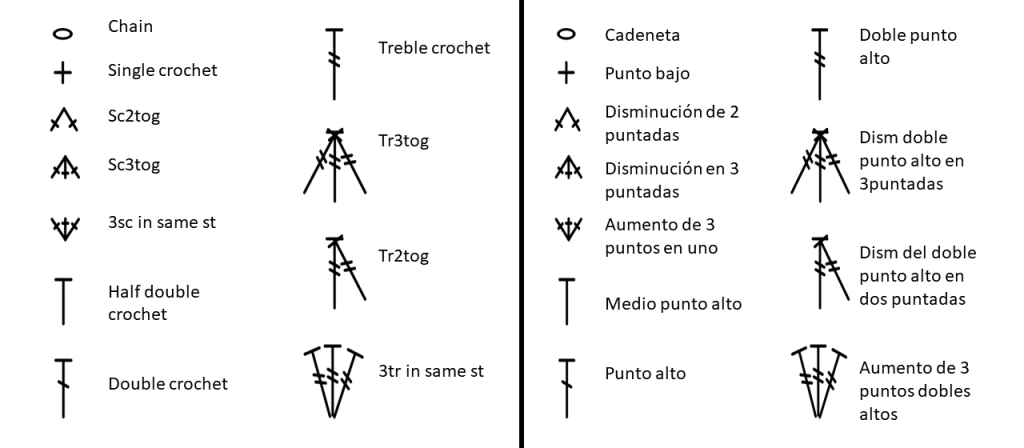
ABREVIACIONES
C1-2-3-4: Color 1, 2, 3, 4
F1: Fila 1
Rnd1: Ronda 1
Cad: Cadeneta
Pd: Punto deslizado
Nc: Nudo corredizo
Pb: Punto bajo
Mpa: Medio Punto Alto
Pa: Punto alto
Dpa: Doble punto alto
Pard: Punto alto en relieve por delante
Para: Punto alto en relieve por detrás
Dism: Disminución
Aum: Aumento
Rep**: Repite todas las instrucciones entre paréntesis
ABBREVIATIONS (US TERMS)
C1-2-3-4: Color 1, 2, 3 and 4
Rnd1: Round 1
Ch: Chain
Sl st: Slip stitch
Sl knot: Slip knot
sc: Single crochet
Hdc: Half double crochet
Dc: Double crochet
Tr: Treble crochet
FPsc: Front post single crochet
FPdc: Front post double crochet
BPdc: Back Post double crochet
sc2tog: Single crochet 2 together
sc3tog: single crochet 3 together
Instrucciones / Pattern
Con Color 1 Comienza urdiendo 38 cadenetas (si estas utilizando otro grosor, urde tantas cadenetas como puedas para llegar a 20 cm aproximadamente. Este diseño es multiplo de 6+1 así que debes tener en cuenta eso al momento de contar las cadenetas. No pasa nada si te pasas un poco de los 20 cm. Al final le agregas otra cad (que no cuenta como p) para comenzar la fila 1.
F1: C1, teje un pb en la segunda cadeneta desde el ganchillo, teje pb por toda la fila hasta terminar. 37 pb.
F2: C1, 1cad (no cuenta como p), 1pb, *1mpa, 1pa, 3dpa en el siguiente p, 1pa, 1mpa, 1pb* rep ** hasta terminar la fila, remata y corta, gira.
F3: C2, nc, dism pb en los primeros dos p, *2pb, 1aum de 3pb, 2pb, dism de 3pb* rep** hasta terminar, 2pb, 1aum de 3pb, 2pb, 1dism de 2pb, gira.
F4: C2, 1cad (no cuenta como p), 1dism de 2pb en los primeros dos p, *2pb, 1aum de 3pb, 2pb, dism de 3pb* rep** hasta terminar, 2pb, 1aum de 3pb, 2pb, 1dism de 2pb, cierra y corta, gira.
F5: Une C3 al tejido, 3ch (cuenta como medio dpa), 1dpa ,* 1pa, 1mpa, 1pb, 1mpa, pa, 1dism de 3dpa* rep** hasta terminar, 1dpa , 1pa, 1mpa, 1pb, 1mpa, pa, 1dism de 2dpa, gira.
F6: C3, 1cad (no cuenta como p), pb por toda la fila hasta terminar, gira.
F7:C3, Rep F6.
F8: C3, Rep F2.
F9-10: C2, rep F3-4. Cierra y corta en la F10, gira.
F11:C1, Rep F5.
F12: C1, Rep F6.
F13-84: Repite desde la fila 1 a la 12.
NOTA: si utilizas otro gorosr de hilo, sólo tienes que repetir desde la Fila 1 hasta la Fila 12 tantas veces como sea necesario para alcanzar una longitud de 60 cm aprox.
Bloquea.d
With Color 1 Start by warping 38 chains. If you are using another yarn weight, warp as many chain stitches as you can to get to approximately 20 cm/ 7 3/4 in. This design is a multiplo of 6+1 so you must take that into account when you are warping the chain stitches. It’s okay if you go a little over 20 cm/ 7 3/4 in.
Row1: C1, work sc in second chain from hook, sc in each ch to end, turn. 37 scs.
Row2: C1, Ch1 (does not count as st), sc in next st, *hdc in next st, dc in next st, 3tr in next st, dc in next st, hdc in next st, sc in next st, rep from** to end row, fasten off, turn.
Row3: C2, sl knot, *sc2tog in first two sts, sc in next 2 sts, 3sc in next st, sc in next 2 sts, sc3tog in next 3 sts, rep from** to end row, sc in next 2 sts, 3sc in next st, sc in next 2 sts, sc2tog in last two sts, turn.
Row4: C2, ch1 (does not count as st), *sc2tog in first two sts, sc in next 2 sts, 3sc in next st, sc in next 2 sts, sc3tog in next 3 sts, rep from** to end row, sc in next 2 sts, 3sc in next st, sc in next 2 sts, sc2tog in last two sts, fasten off, turn.
Row5: Join C3, ch3(count as half treble), treble in next st,* dc in next st, hdc in next st, sc in next st, hdc in next st, dc in next st, 3tr in next st, rep from** to end row, tr2tog in last two sts, turn.
Row6: C3, ch1 (does not count as st), sc all stitches to end row, turn.
Row7: C3, repeat Row6, turn.
Row8: C3, Repeat Row2, fasten off, turn.
Row9-10: With C2, Repeat Row3-4, fasten off in row 10, turn.
Row11: With C1, Repeat Row5, turn.
Row12: C1, repeat row6, turn.
Row13- 84: Repeat Row1-12, fasten off.
NOTE: if you are using another yarn weight, you just have to repeat from Row1 to Row12 as many times as necessary to reach a length of approximately 60 cm / 23 1/2 in.
Block
Now you have to make your own Pom Pom, and I leave you here a tutorial video!
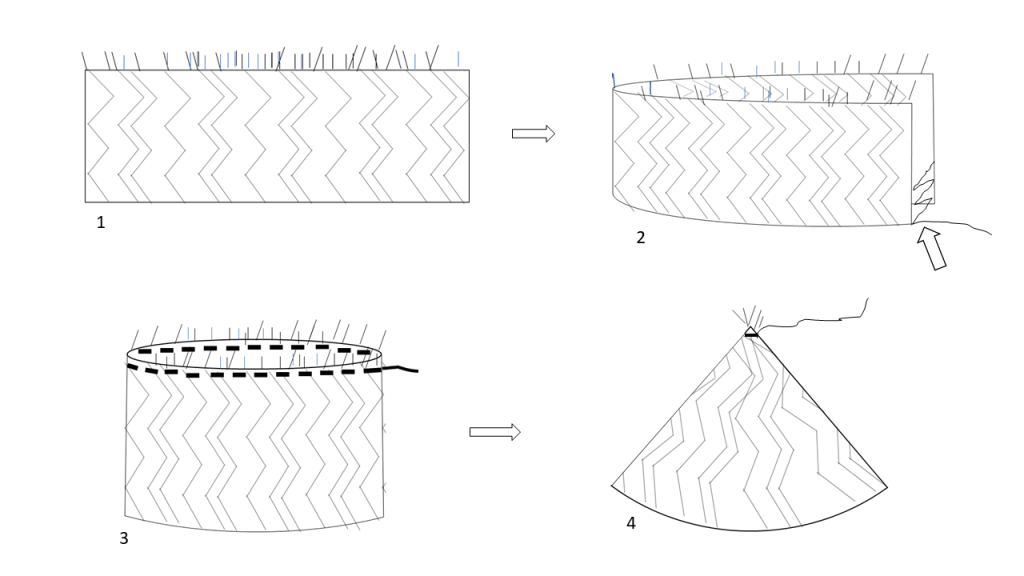
Trabajaremos del lado revés del tejido. Ahora debes doblar el tejido por la mitad. Corta una hebra del mismo color 1 (con el que comenzaste y terminaste el tejido) y une ambos extremos con el crochet, puntada por puntada (ver esquema, 1 y 2). Luego cuando esté unido tienes que pasar la misma hebra por todo el contorno superior, que en este caso sería el lado en que están todas las hebras sueltas (esquema,3) y por último tira cuidadosamente la hebra para cerrar el contorno superior, cierra y corta. Cuida que todas las hebras queden por el lado revés (esquema, 4).
Una vez hecho esto, da vuelta el tejido y pega el pompom a la parte superior.
Work on the wrong side of your fabric. Now you must fold the fabric in half. Cut a strand of the same color 1 (with which you started and finished this project) and join both ends with the hook, stitch by stitch (see scheme, 1 and 2). Then when it is joined you have to pass the same yarn through all the top contour, which is the side where all the strands are loose (scheme, 3) and finally carefully pull the yarn to join the top contour, fasten off. Make sure that all the strands are on the back side (scheme, 4).
Once this is done, turn the fabric over right side and join the pompom to the top.
Ahora unes el pom pom a la parte superior del gorro, cierras y cortas hebra.
Comienzas a tejer desde la parte inferior la Pretina del gorro.
PRETINA
R1: C4, nc, comienzas a tejer puntos alto por toda la ronda, 1 punto alto en cada fila, y dos puntos altos en la fila donde encontrarás un dpa, pd para unir. La cantidad de puntos en el conteo final debe ser múltiplo de 4, si tienes más, sólo debes disminuir algún punto, si tienes menos, debes agregar alguno.
R2: Teje un pb en relieve por delante más 1cad (estos puntos cuenta como 1 pard), 1 pard, *1para, 1para, 1pard, 1pard* rep** hasta terminar, pd para unir.
R3-6: Rep R2, cierra y corta.
Puedes ver el video para ayudarte a ver cómo se une el pompom, para ver puntadas o saber cómo se hace la pretina.
Now, you have to join the pompom to the top of the hat.
RIBBING
From the bottom of the hat and with C4
Rnd1: sl knot, dc in each row of the fabric, and 2dc in each row of tr. The final count have to be a multiple of 4. So, you can add stitches or work decreases to get at the required number.
Rnd2: FPsc and ch1 (count as FPdc), FPdc, BPdc in next 2 dcs, FPdc in next 2dcs, rep from** to end, sl st to join.
Rnd3-6: Rep Rnd2. Fasten off.
You can watch the suppor video to see how to make some stitches, or join the pompom or how to make the ribbing.
Gracias por leer. Recuerda que puedes adaptar este gorro a medidas más pequeñas o grandes, sólo teniendo en cuenta los múltiplos a seguir.
Para más información sobre la campaña, puedes visitar su página web https://yotejo.com/pages/yotejoparati
Este patrón no ha sido testeado, así que si encuentras algún error de tipeo o matemático, sientete libre de hacermelo saber para corregirlo 🙂
Thanks for being here! You can to adapt this hat to your own measurements, you just have to keep in mind the multiples that this pattern use.
This pattern has not been tested, so if you find any math error, feel free to let me know.